
|
On This Page |
|---|
Introduction
Below you will find an example of our HelioCampus LTI 1.3 integration guide that you can review.
HelioCampus D2L LTI 1.3 Configuration
This document covers requirements for HelioCampus / D2L integration using LTI 1.3 standards defined by 1EdTech. A D2L Administrator working with a HelioCampus integration technician can complete requirements. There may be additional personnel required for unforeseen circumstances such as client network or server restrictions.
HelioCampus LTI 1.3 Tool
The HelioCampus Tool allows students and instructors the ability to view a HelioCampus course syllabus within a related course and complete assessment forms.
HelioCampus Assessment Platform Registration
First, the HelioCampus Assessment Platform should be registered. To be able to do that;
-
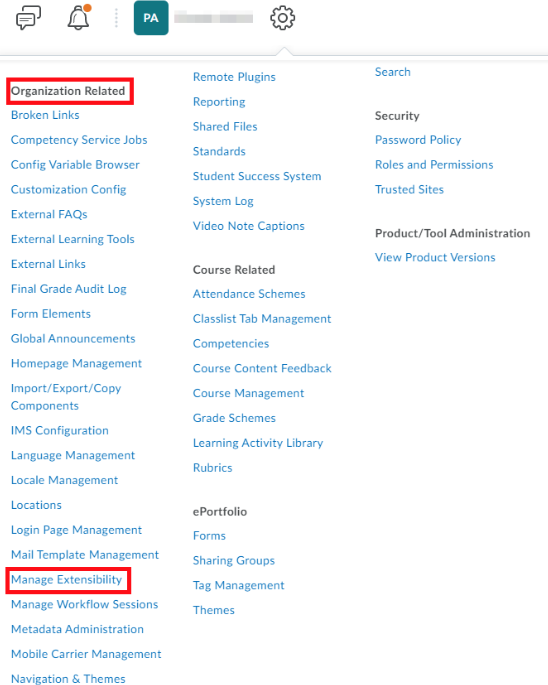
Expand the Admin Tools menu. Under Organization Related, scroll down and select Manage Extensibility.

-
Register an App
-
Application Name: HelioCampus Assessment Platform
-
Trusted URL: https://<HelioCampus_URL>/index.cfm/page/AefisFramework.login?authenticatorcode=advantage
-
Major Versions: 1
-
Minor Version: 0
-
Enable this application: checked
-
I accept the Non-Commercial Developer Agreement: checked
-
-
On the window that appears, make a note of your Application ID and Application Key for later.
Configuring the External Learning Tool
-
Expand the Admin Tools menu, under Organization Related, and select Manage Extensibility.
-
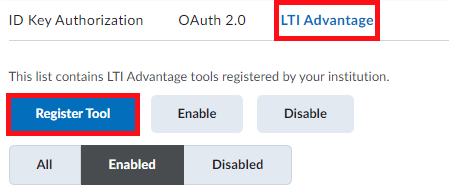
At the top of the window, select the LTI Advantage tab and then select the Register Tool button.
-
On the register tool page, select Standard, fill in the following fields, and select Register
-
Name: HelioCampus Tools LTI 1.3
-
Description: HelioCampus Assessment Platform is a web-based assessment management solution that facilitates the collection and application of real-time assessment data.
-
Domain: https://<HelioCampus_URL>/index.cfm/page/AefisFramework.login?authenticatorcode=advantage
-
Redirect URLs: https://<HelioCampus_URL>/index.cfm/page/AefisFramework.login?authenticatorcode=advantage
-
OpenID Connect Login URL: https://<HelioCampus_URL>/index.cfm/page/AefisFramework.login?authenticatorcode=advantage
-
Target Link URI: https://<HelioCampus_URL>/index.cfm/page/AefisFramework.login?authenticatorcode=advantage
-
Keyset URL: No value here
-
Extensions: Nothing selected
-
Send Institution Role: checked
-
Substitution Parameter:
-
If you want to match on the user other than the “primaryemailaddress” (this is the default match) value that is provided within the data files, please add:
-
Name = “lis_person_sourcedid”, Value = “$User.username” (“username” field in data files)
-
-
-
Custom Parameters:
-
To change the landing page of the link, please add:
-
Name=ACCESSURL, Value=AefisCourseSection.SyllabusForm (Default Landing Page, no need to add this attribute if you do not require to land on different page)
-
-
-
Below is a list of all possible alternate landing pages (change the Value part with the paths on the list below):
-
Course Outcomes: AefisCourseSection.CourseLearningObjectives
-
Program Outcomes: AefisCourseSection.AssociatedPrograms
-
Student Performance: AefisCourseSection.StudentPerformance
-
Course Section Questions: AefisCourseSection.QuestionDesigner
-
Evaluation Results: AefisCourseSection.SurveyResults
-
Assignments: AefisCourseSection.Assignments
-
Assignment Linking: AefisCourseSection.AssignmentMapping
-
Assessment Data: AefisCourseSection.Assessments
-
Assignment Samples: AefisCourseSection.AssignmentSamples
-
On the window that appears, make a note of all registration details. Then click Done.
-
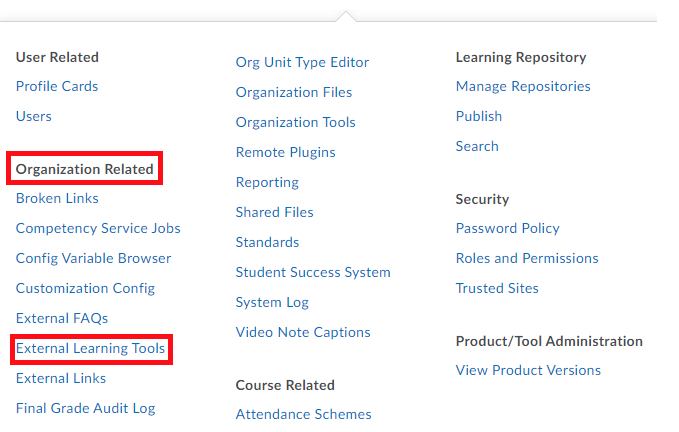
Expand the Admin Tools menu and select External Learning Tools from under Organization Related
-
On the LTI Advantage tab, select New Deployment to create a new LTI 1.3. provider.
-
On the Deploy Tool window, locate and select your HelioCampus tool(HelioCampus Tools LTI 1.3) in the Tool menu dropdown, and then provide the following information. Once you are done, select Create Deployment.
-
Name: HelioCampus Assessment Tool Deployment
-
Security Settings
-
Org Unit Information
-
User Information
-
Keep all fields checked
-
-
Link Information
-
Keep all fields checked
-
-
-
Configuration Settings
-
Open as External Resource: checked
-
-
Make tool available to:
-
Click “Add Org Units”, find HelioCampus, select “This org unit and all descendants“, and click “Add“
-
-
-
On the window that appears, make a note of the Deployment ID. Then click Done.
Create Links
-
In the tool you've just created, scroll to the bottom and select View Links.

-
At the top of the Links page, select New Link
-
Configure the link as follows and select Save and Close
-
Name: HelioCampus Assessment Tool Link
-
URL (case sensitive): https://<HelioCampus_URL>/index.cfm/page/AefisFramework.login?authenticatorcode=advantage
-
Type: Basic Launch
-
Add The LTI Link To NavBar
The following will add the HelioCampus Tools link directly to the NavBar and will be available to all users, if you wish to not share with all child org units or limit to certain user roles you may do that based on your institution’s policies. Also if you wish to add the link to an existing drop-down link please consult the D2L documentation.
-
Hover over the NavBar and click the button to the right with the three dots
-
Click Manage All Course NavBars
-
Find then click on the NavBar you wish to add the button to
-
Under Links Click Add Links
-
Click Create Custom Link
-
Fill out the form with the following values:
-
Name: HelioCampus Tools
-
URL:
-
Click Insert Quick Link
-
Scroll down and Click External Learning Tools
-
Click HelioCampus Assessment Tool Link
-
-
Behavior: Choose Same Window
-
Description: Launch the HelioCampus Tools.
-
Icon: If you use Icons in the NavBar please download the icon from the following link and then upload it https://goo.gl/p312yp
-
-
Click Create, then Add
-
Move the new link where you would like it located under Links
-
Click Save and Close
-
Please send your D2L URL, Client ID, and Deployment ID securely to your HelioCampus integration contact.