
|
On This Page |
|---|
Introduction
Welcome to the HelioCampus Canvas LTI 1.3 Integration Guide. The HelioCampus LTI 1.3 Tool allows students and instructors to access a HelioCampus Assessment & Credentialing course section within a related Canvas course. This document provides step-by-step instructions for configuring the integration between HelioCampus Assessment & Credentialing and Canvas using the LTI 1.3 standard and completing the HelioCampus Assessment & Credentialing LMS Information Form.
Generating a Canvas LTI Developer Key
A Canvas Administrator must generate an LTI Developer Key within the institution's Canvas instance by following these steps:
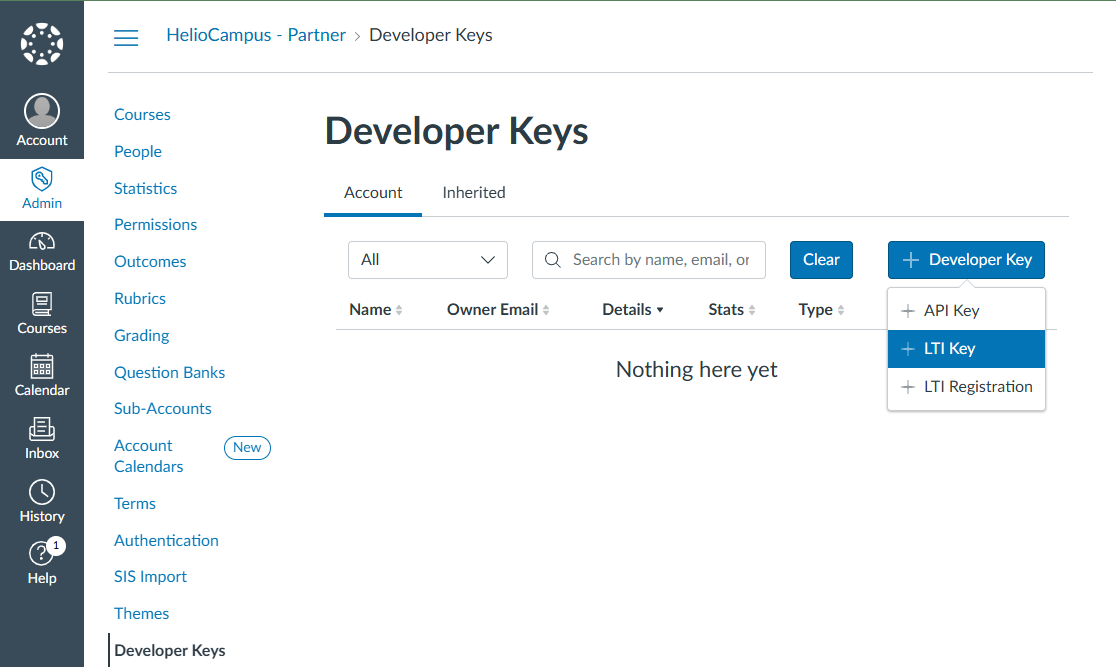
1. Navigate to Developer Key Settings
-
Log into Canvas as an Admin.
-
Navigate to Admin and select the appropriate managed account.
-
Click Developer Keys.
-
Click the + Developer Key button and choose LTI Key.
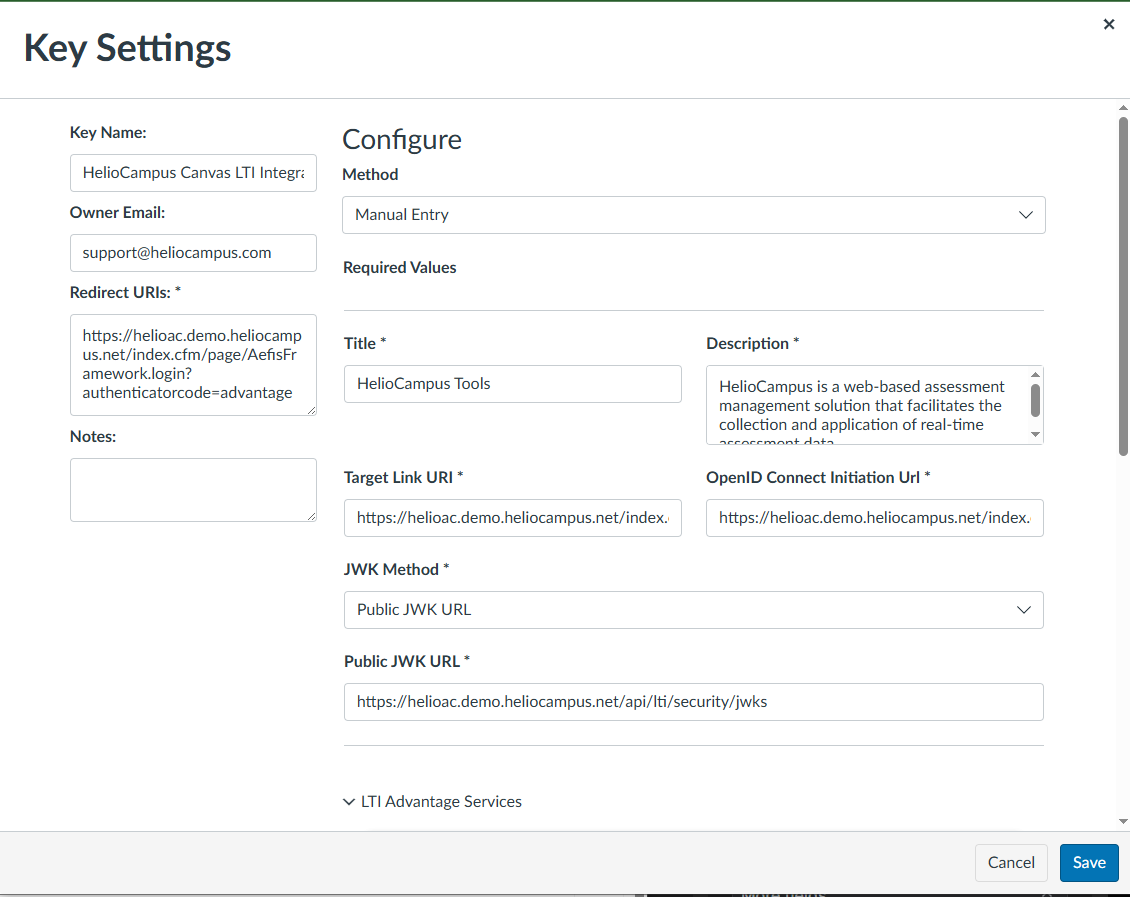
2. Configure the Key Settings
In the Key Settings dialog, enter the following details:
Note: In the following instructions replace <HelioCampus_URL> with your institution’s HelioCampus Assessment & Credentialing URL.
Note: Replace <YOUR INSTITUTION’S CANVAS_URL> with your institution’s Canvas URL.
If your Canvas instance has a vanity URL (e.g., canvas.institution.edu) that most users use to access Canvas, be sure to use that URL.
|
Field |
Value |
|---|---|
|
Key Name |
Only Canvas Admins will be able to view the Key Name. HelioCampus suggests using “HelioCampus Canvas LTI Integration”. |
|
Owner Email |
|
|
Redirect URIs |
https://<HelioCampus_URL>/index.cfm/page/AefisFramework.login?authenticatorcode=advantage |
|
Method |
Choose Manual Entry |
|
Title |
This is the course menu item the users see in Canvas, we suggest, HelioCampus Tools |
|
Description |
HelioCampus is a web-based assessment management solution that facilitates the collection and application of real-time assessment data. |
|
Target Link URI |
https://<HelioCampus_URL>/index.cfm/page/AefisFramework.login?authenticatorcode=advantage |
|
OpenID Connect Initiation URL |
https://<HelioCampus_URL>/index.cfm/page/AefisFramework.login?authenticatorcode=advantage |
|
JWK Method |
Choose Public JWK URL |
|
Public JWK URL |
https://<YOUR INSTITUTION’S CANVAS_URL>/api/lti/security/jwks |
|
LTI Advantage Services |
Skip this section and leave the defaults of everything turned off. |
|
Additional Settings |
Privacy Level: Choose Public |
|
Additional Settings |
Custom Fields: See Set Up User Matching |
|
Placements |
3. Set Up User Matching
By default, Canvas LTI 1.3 matches users based on the Default Email found under Name and Email. However, because many institutions allow users to change their email addresses, we recommend using values from the Login Information section instead for more reliable user identification.
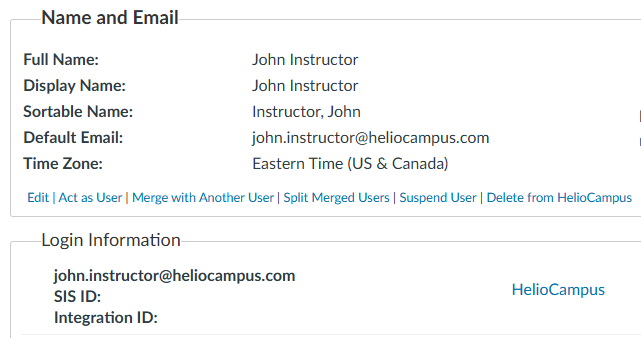
To do this, choose one of the recommended fields below, copy the corresponding Custom Field Value, and paste it into Custom Fields:
|
Field |
Custom Field Value |
|
Login ID (Most Common) |
|
|
SIS ID |
|
|
Integration ID |
|
If you paste any of the options into Custom Fields, ensure you check the box under LTI User Match on the HelioCampus Assessment and Credentialing LMS Information Form.
Additionally, under API User Match Options on the same form, select the appropriate mapping:
-
lis_person_sourcedid=$Canvas.user.loginId→ Choose NA -
lis_person_sourcedid=$Canvas.user.sisSourceId→ Choose sis_user_id -
lis_person_sourcedid=$Canvas.user.sisIntegrationId→ Choose integration_id
4. Configure Placement Settings
-
Under Placements, remove any pre-populated values.
-
Choose Course Navigation.
-
Expand Course Navigation and enter:
-
Target Link URI: https://<HelioCampus_URL>/index.cfm/page/AefisFramework.login?authenticatorcode=advantage
-
Icon URL: https://<HelioCampus_URL>/assets/images/logos/AefisLogoNoTextSmall-alt@2x.png
-
-
Leave Selection Height and Selection Width blank.
Customizing the LTI 1.3 Connection
If you would like to customize the LTI 1.3 connection between Canvas and HelioCampus Assessment & Credentialing, refer to the Canvas Customizing LTI 1.3 at this point. Among other options, a customized configuration allows you to:
-
Hide an LTI tool from students
-
Change the landing page for the LTI connection.
-
Customize menu items
5. Save and Activate the key
-
Click Save.
-
Verify the key appears in the list.
-
Switch the State of the key to ON.

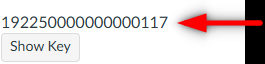
-
Copy the Developer Client ID and paste it into the LTI 1.3 Client ID field on the HelioCampus Assessment and Credentialing LMS Information Form.
Completing the LTI 1.3 Configuration
-
Navigate to Settings in Canvas.
-
Go to the Apps tab.
-
Click View App Configurations.
-
Click the + App button.
-
In the Configuration Type dropdown, select By Client ID.
-
Paste the Developer Key ID into the Client ID field.
-
Click Submit and then Install.
-
Locate the newly created External App in the list.
-
Click the Settings (Gear Icon) button next to the app.
-
Click Deployment ID.
-
Copy the Deployment ID.
-
Click Close.
-
Paste the Deployment ID into the LTI 1.3 Deployment ID field on the HelioCampus Assessment and Credentialing LMS Information Form.
Once all steps are completed, return to the main Canvas Integration Guide and move on to the API Integration steps.