
|
On This Page |
|---|
Introduction
This guide provides instructions on customizing the LTI 1.3 tools between Canvas and HelioCampus Assessment and Credentialing. Among other options, a customized configuration allows you to:
-
Hide an LTI tool from students
-
Change the landing page for the LTI connection.
-
Customize menu items
Customizing LTI 1.3 Tool
A Canvas Administrator must complete the following steps:
1. If not already there, navigate to Developer Key Settings
-
Log into Canvas as an Admin.
-
Navigate to Admin and select the appropriate managed account.
-
Click Developer Keys.
-
Find the existing LTI 1.3 Developer Key you want to customize, click the Edit (pencil icon).
Customizing the LTI 1.3 Landing Page
By default, the LTI 1.3 tool directs users to the Syllabus page. However, you can configure it to open to a different page based on your needs. This is one of the most common customizations.
Available Landing Pages
|
Landing Page |
Value |
|---|---|
|
Course Outcomes |
accessurl=AefisCourseSection.CourseLearningObjectives |
|
Program Outcomes |
accessurl=AefisCourseSection.AssociatedPrograms |
|
Student Performance |
accessurl=AefisCourseSection.StudentPerformance |
|
Course Section Questions |
accessurl=AefisCourseSection.QuestionDesigner |
|
Survey Results |
accessurl=AefisCourseSection.SurveyResults |
|
Assignments |
accessurl=AefisCourseSection.Assignments |
|
Assignment Linking |
accessurl=AefisCourseSection.AssignmentMapping |
|
Assessment Data |
accessurl=AefisCourseSection.Assessments |
|
Assignment Samples |
accessurl=AefisCourseSection.AssignmentSamples |
Note on Survey Results Page
If you intend to create an LTI 1.3 tool that allows students to take surveys directly within Canvas, use the Survey Results value.
When the LTI tool launches, it verifies the user’s role and permissions in HelioCampus Assessment and Credentialing:
-
Students will see an adjusted page that includes an option to take surveys.
-
Admins and Faculty will see the standard interface without this additional option.
This ensures that the tool dynamically adapts based on the user's role.
Steps to Modify Landing Page
-
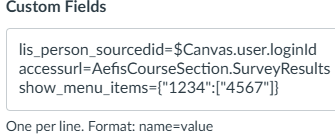
Expand Additional Settings and find Custom Fields.
-
Copy the Value for the Landing Page from the table above and paste it on a new line in Custom Fields

-
Click Save to apply the changes.
Customizing LTI 1.3 Tool Visibility to Users
This optional setting determines who can access the LTI 1.3 tool in the Canvas Course Navigation Menu.
Available Visibility Options from Canvas
-
admins – Visible only to Teachers, TAs, Course Designers (or any role built from these base roles) or has any account role that grants access to the course.
-
members – Visible only to anyone who is in the course with role of students
-
public – Visible to all users.
Steps to Modify Visibility
-
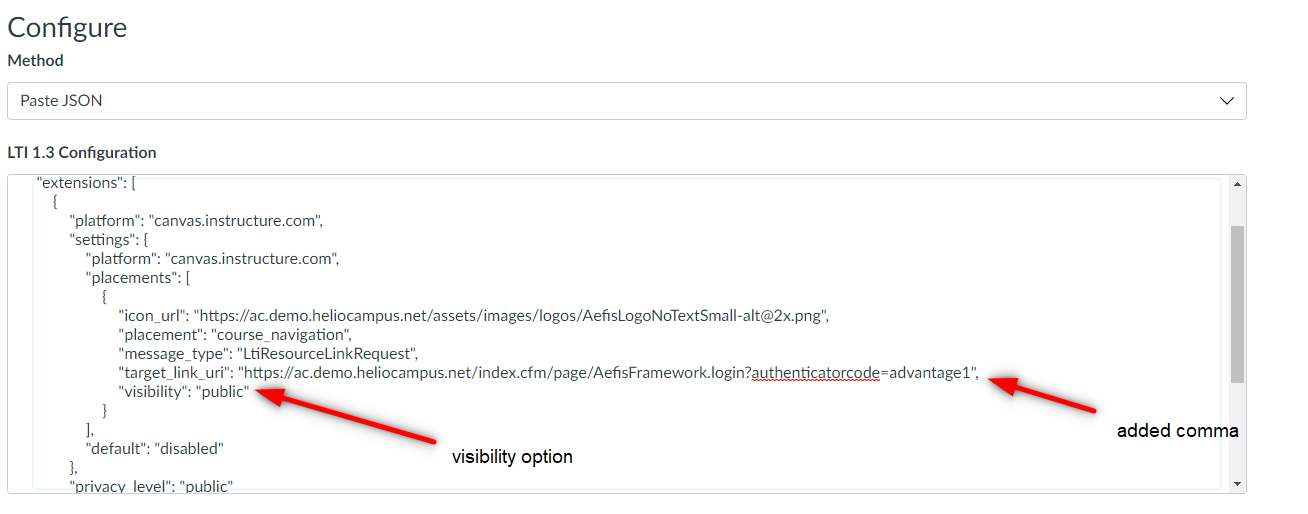
Under Method, choose Paste JSON.
-
Locate the "target_link_uri" line under placements.
-
At the end of the "target_link_uri" line type a comma and press enter
-
Paste the "visibility” option on the new line:
"visibility": "<desired_option>"Example for admin-only access:
"visibility": "admins"
-
Click Save to apply the changes.
Customizing LTI 1.3 Tool Visibility on the Course Navigation Menu
This optional setting determines if the LTI 1.3 tool is displayed by default in the Course Navigation Menu
or hidden.
The Canvas default for this setting is enabled when you create an LTI Developer Key.
Available Visibility Options from Canvas
-
enabled– Enabled in Course Navigation Menu
-
disabled– Hidden from Course Navigation Menu, can be found under Course → Settings → Navigation → Under hidden items
Steps to Modify Visibility
-
Under Method, choose Paste JSON.
-
Locate the "default" line under settings.
-
Change the setting to the value you desire.
"default": "<desired_option>"Example to hide the LTI 1.3 Tool from the menu:
"default": "disabled" -
Click Save to apply the changes.
Customizing the LTI 1.3 Menu Items
You can also modify the HelioCampus Assessment and Credentialing menu items displayed within the LTI 1.3 tool to show only specific menu items.
1. Review and decide on the desired menu items
Begin by reviewing the available LTI 1.3 tool menu items and selecting which ones should be visible when launching the tool.
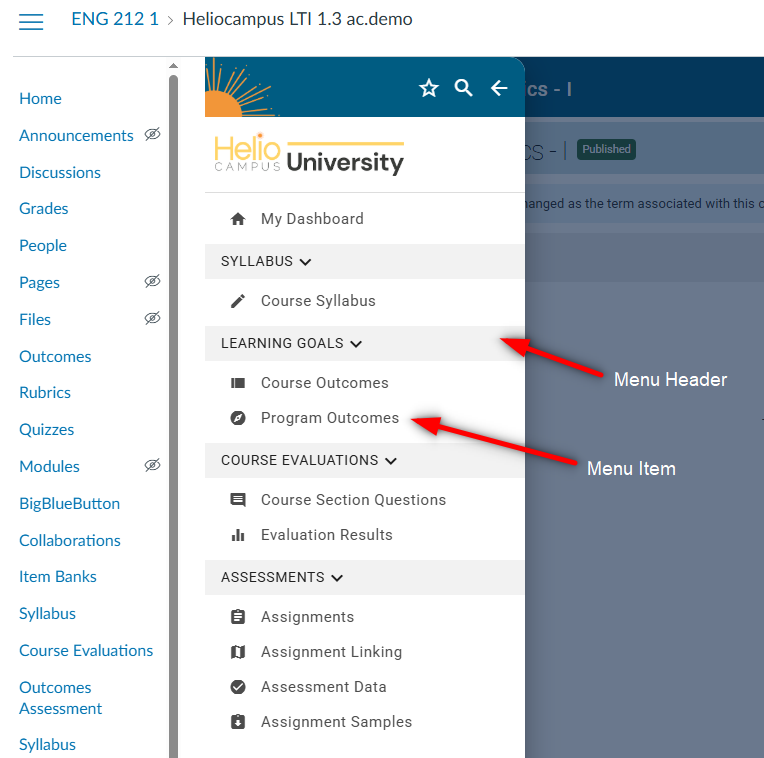
Above is an image of the default LTI menu, please decide which Menu Header(s) and Menu Item(s) that you would like displayed.
Once you have determined the desired menu items, contact your HelioCampus implementation team and provide them with your selection.
Your HelioCampus team will then supply you with the appropriate configuration line to add to Custom Fields.
For example: show_menu_items={"1234":["4567"]}
The only exception to the above is if you don’t want to display any menu items. In that case, you can skip to the next step and use the following configuration: show_menu_items={}.
Steps to Modify the Menu
-
Expand Additional Settings and locate Custom Fields.
-
Copy the configuration line and paste it on a new line in Custom Fields
-
Click Save to apply the changes.