
|
On This Page |
|---|
Introduction
This guide provides instructions on customizing the LTI 1.3 tools between D2L Brightspace and HelioCampus Assessment and Credentialing. A customized configuration allows you to:
-
Modify the landing page for the tool.
-
Modify the menu items shown the tool.
Customizing LTI 1.3 Tool
A D2L Brightspace Administrator must complete the following steps:
1. Navigate to External Learning Tool Settings
-
Log into D2L Brightspace as an Admin.
-
Click the Admin Tools (gear icon) in the top right.
-
Under Organization Related, select External Learning Tools.
-
Find and select the LTI 1.3 tool you wish to modify, e.g. HelioCampus LTI 1.3 Deployment
-
Scroll to the bottom and select View Links.
-
Select the Link, e.g. HelioCampus LTI 1.3 Link
Customizing the LTI 1.3 Landing Page
By default, the LTI 1.3 tool directs users to the Syllabus page. However, you can configure it to open to a different page based on your needs. This is one of the most common customizations.
Available Landing Pages
|
Page |
Value |
|---|---|
|
Course Outcomes |
AefisCourseSection.CourseLearningObjectives |
|
Program Outcomes |
AefisCourseSection.AssociatedPrograms |
|
Student Performance |
AefisCourseSection.StudentPerformance |
|
Course Section Questions |
AefisCourseSection.QuestionDesigner |
|
Survey Results |
AefisCourseSection.SurveyResults |
|
Assignments |
AefisCourseSection.Assignments |
|
Assignment Linking |
AefisCourseSection.AssignmentMapping |
|
Assessment Data |
AefisCourseSection.Assessments |
|
Assignment Samples |
AefisCourseSection.AssignmentSamples |
Note on Survey Results Page
If you intend to create an LTI 1.3 tool that allows students to take surveys directly within D2L Brightspace, use the Survey Results value.
When the LTI tool launches, it verifies the user’s role and permissions in HelioCampus Assessment and Credentialing:
-
Students will see an adjusted page that includes an option to take surveys.
-
Admins and Faculty will see the standard interface without this additional option.
This ensures that the tool dynamically adapts based on the user's role.
Steps to Modify Landing Page
-
Scroll down and find Custom Parameters
-
Click + Add Custom Parameter.
-
In the new Custom Parameters dialog, enter the following details:
|
Field |
Value |
|---|---|
|
Name |
ACCESSURL |
|
Value |
Copy the Value for the Page from the table above. |
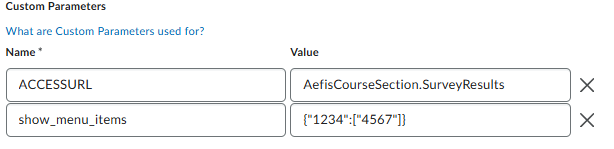
-
Click Save and Close to apply the changes.
Customizing the LTI 1.3 Menu Items
You can also modify the HelioCampus Assessment and Credentialing menu items displayed within the LTI 1.3 tool to show only specific menu items.
1. Review and decide on the desired menu items
Begin by reviewing the available LTI 1.3 tool menu items and selecting which ones should be visible when launching the tool.
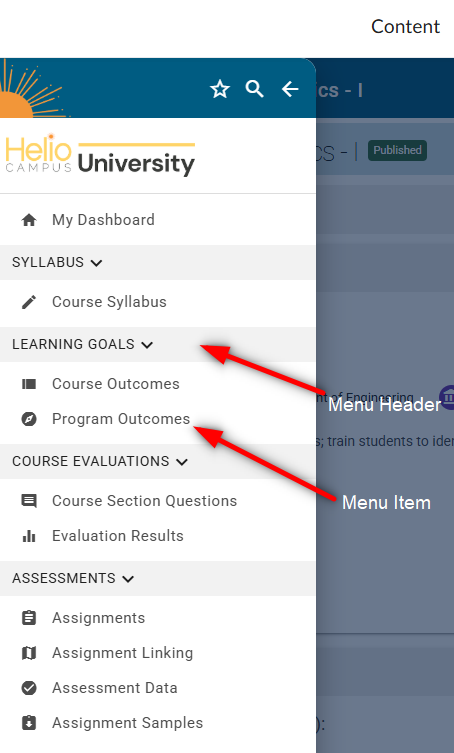
Above is an image of the default LTI menu, please decide which Menu Header(s) and Menu Item(s) that you would like displayed.
Once you have determined the desired menu items, contact your HelioCampus integration technician and provide them with your selection.
Your integration technician will then supply you with the appropriate configuration line to add to Custom Fields.
For example: show_menu_items={"1234":["4567"]}
The only exception to the above is if you don’t want to display any menu items. In that case, you can skip to the next step and use the following configuration: show_menu_items={}.
Steps to Modify Menu
-
Scroll down and find Custom Parameters
-
Click + Add Custom Parameter.
-
In the new Custom Parameters dialog, enter the following details:
|
Field |
Value |
|---|---|
|
Name |
ACCESSURL |
|
Value |
Copy the part of the configuration line between the brackets {} and paste it here. |
-
Click Save and Close to apply the changes.