
HelioCampus typically adds students and instructors automatically through the Institution’s data files, while administrators manage account access and administrative roles in the User Account Manager. Use this area to review user records, assign or update administrative access, and disable accounts that should no longer have access while preserving historical data. To view user accounts, navigate to Main Menu > Admin Tools > User Account Manager.
Downstream Impacts
-
User Access: Disabling a user prevents login while preserving the user account, roles, course associations, and historical records. Deleting a user permanently removes the account and should only be used for duplicate or accidentally created accounts.
-
Survey Participation: Disabled users will not receive active or future survey invitations or reminder emails, which can affect current evaluation participation if the user is associated with active courses or surveys.
-
Historical Data: Disabling an account preserves historical survey, evaluation, and reporting data tied to the user. Deleting an account may affect historical records or links associated with that user.
-
-
Role-based permissions: Adding, removing, or changing administrative roles can affect what a user can access in the platform, including the ability to manage user accounts, use Login As functionality, or view records within the Organizational Hierarchy.
-
Login As Activity: Actions completed while logged in as another user are recorded as actions taken by the admin who initiated the impersonation session.
-
Faculty Portfolio Access: Creating, updating, archiving, deleting, or unarchiving a faculty portfolio can affect whether faculty portfolio information is available to the user and Institution Administrators.
Considerations
-
Permission Requirements: Available actions depend on the user’s administrative role and placement within the Organizational Hierarchy. Users may not see every option shown in this article if they lack the required permissions.
-
Data Source Alignment: Student and instructor accounts are typically created and updated through institutional data files. Before manually updating user information, confirm whether a change should be made in the platform or corrected in the Institution’s source system.
-
Login-as limitations: Use login-as access only when needed for troubleshooting or support. Admins can only log in as users permitted by their role, and actions completed during an impersonation session are recorded as actions taken by the admin who initiated the session.
-
Student Anonymity: Use caution when accessing faculty accounts connected to survey or evaluation results. Login-as restrictions help protect student anonymity, especially when an admin also has a student role.
User Account Manager
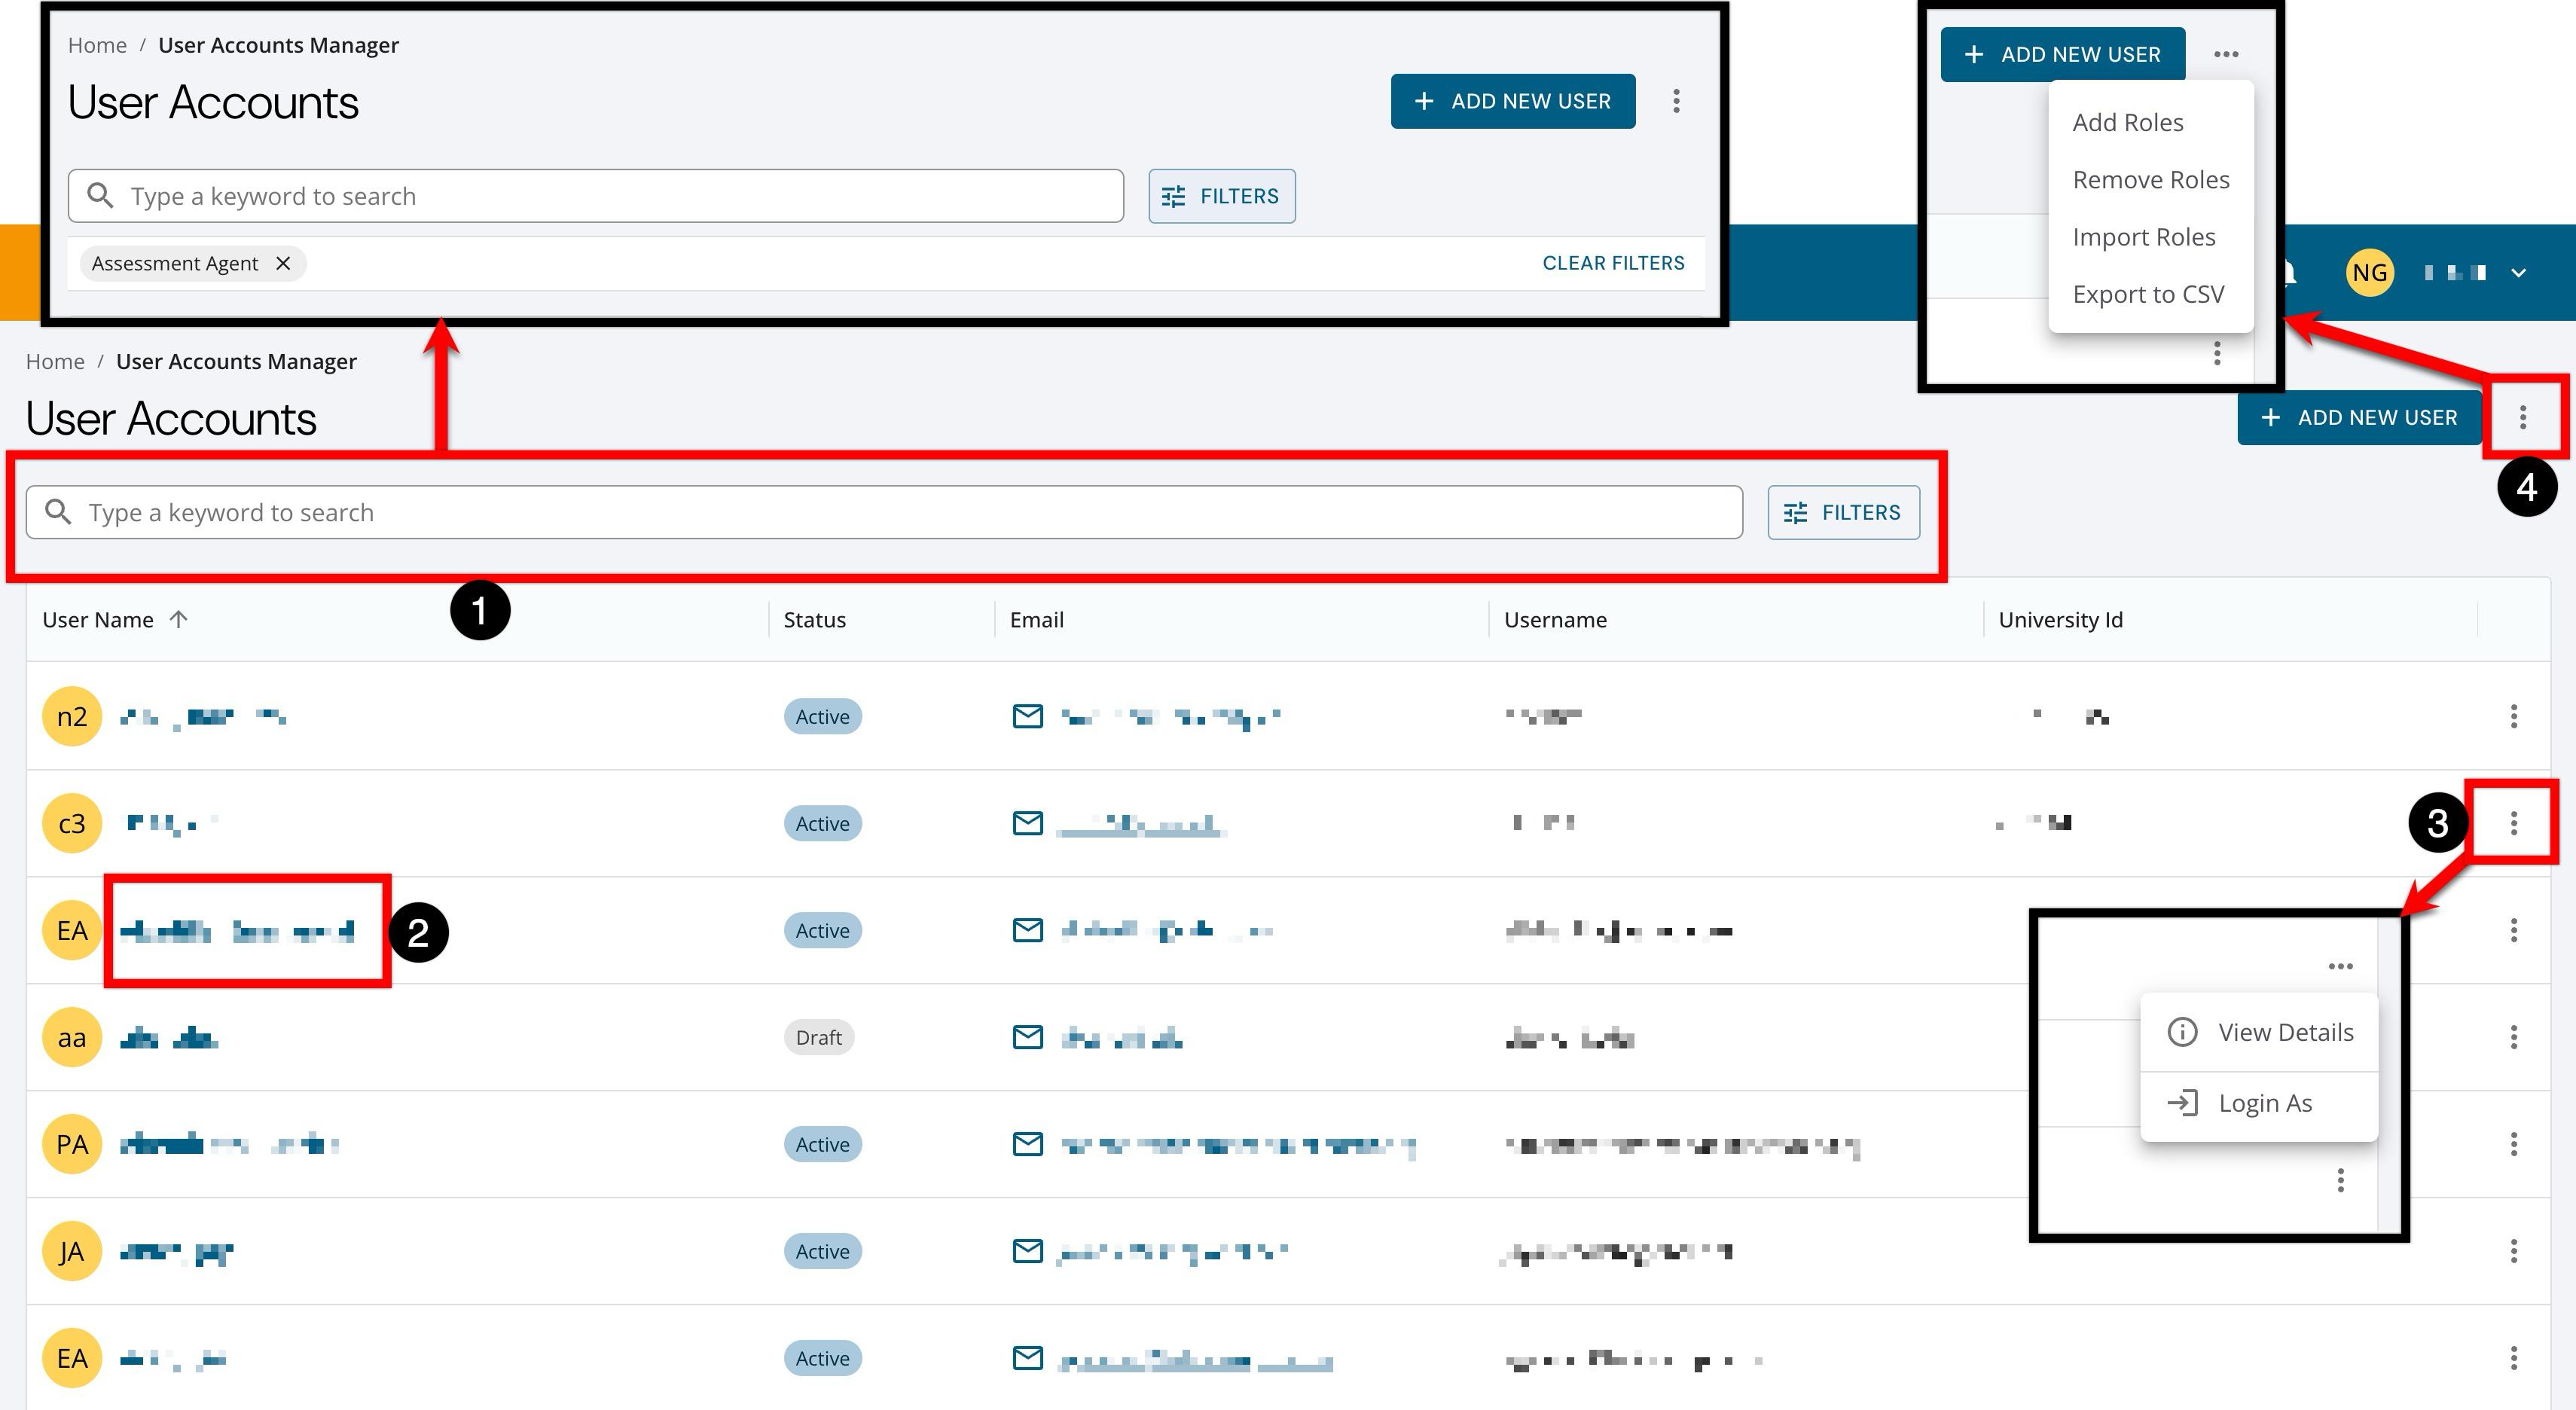
Search functionality is available, and by clicking the Filters option, specific filters can be applied and removed (1). Clicking a user’s name (2) will display the Homepage. By expanding the Actions menu for a user (3), View Details can be selected to view quick-glance information, or the login-as functionality can be used. The Login As functionality is only available to users with sufficient role-based permissions within the hierarchy. Expand the More Actions menu to add, remove, or import roles, and export the manager to CSV format (4).
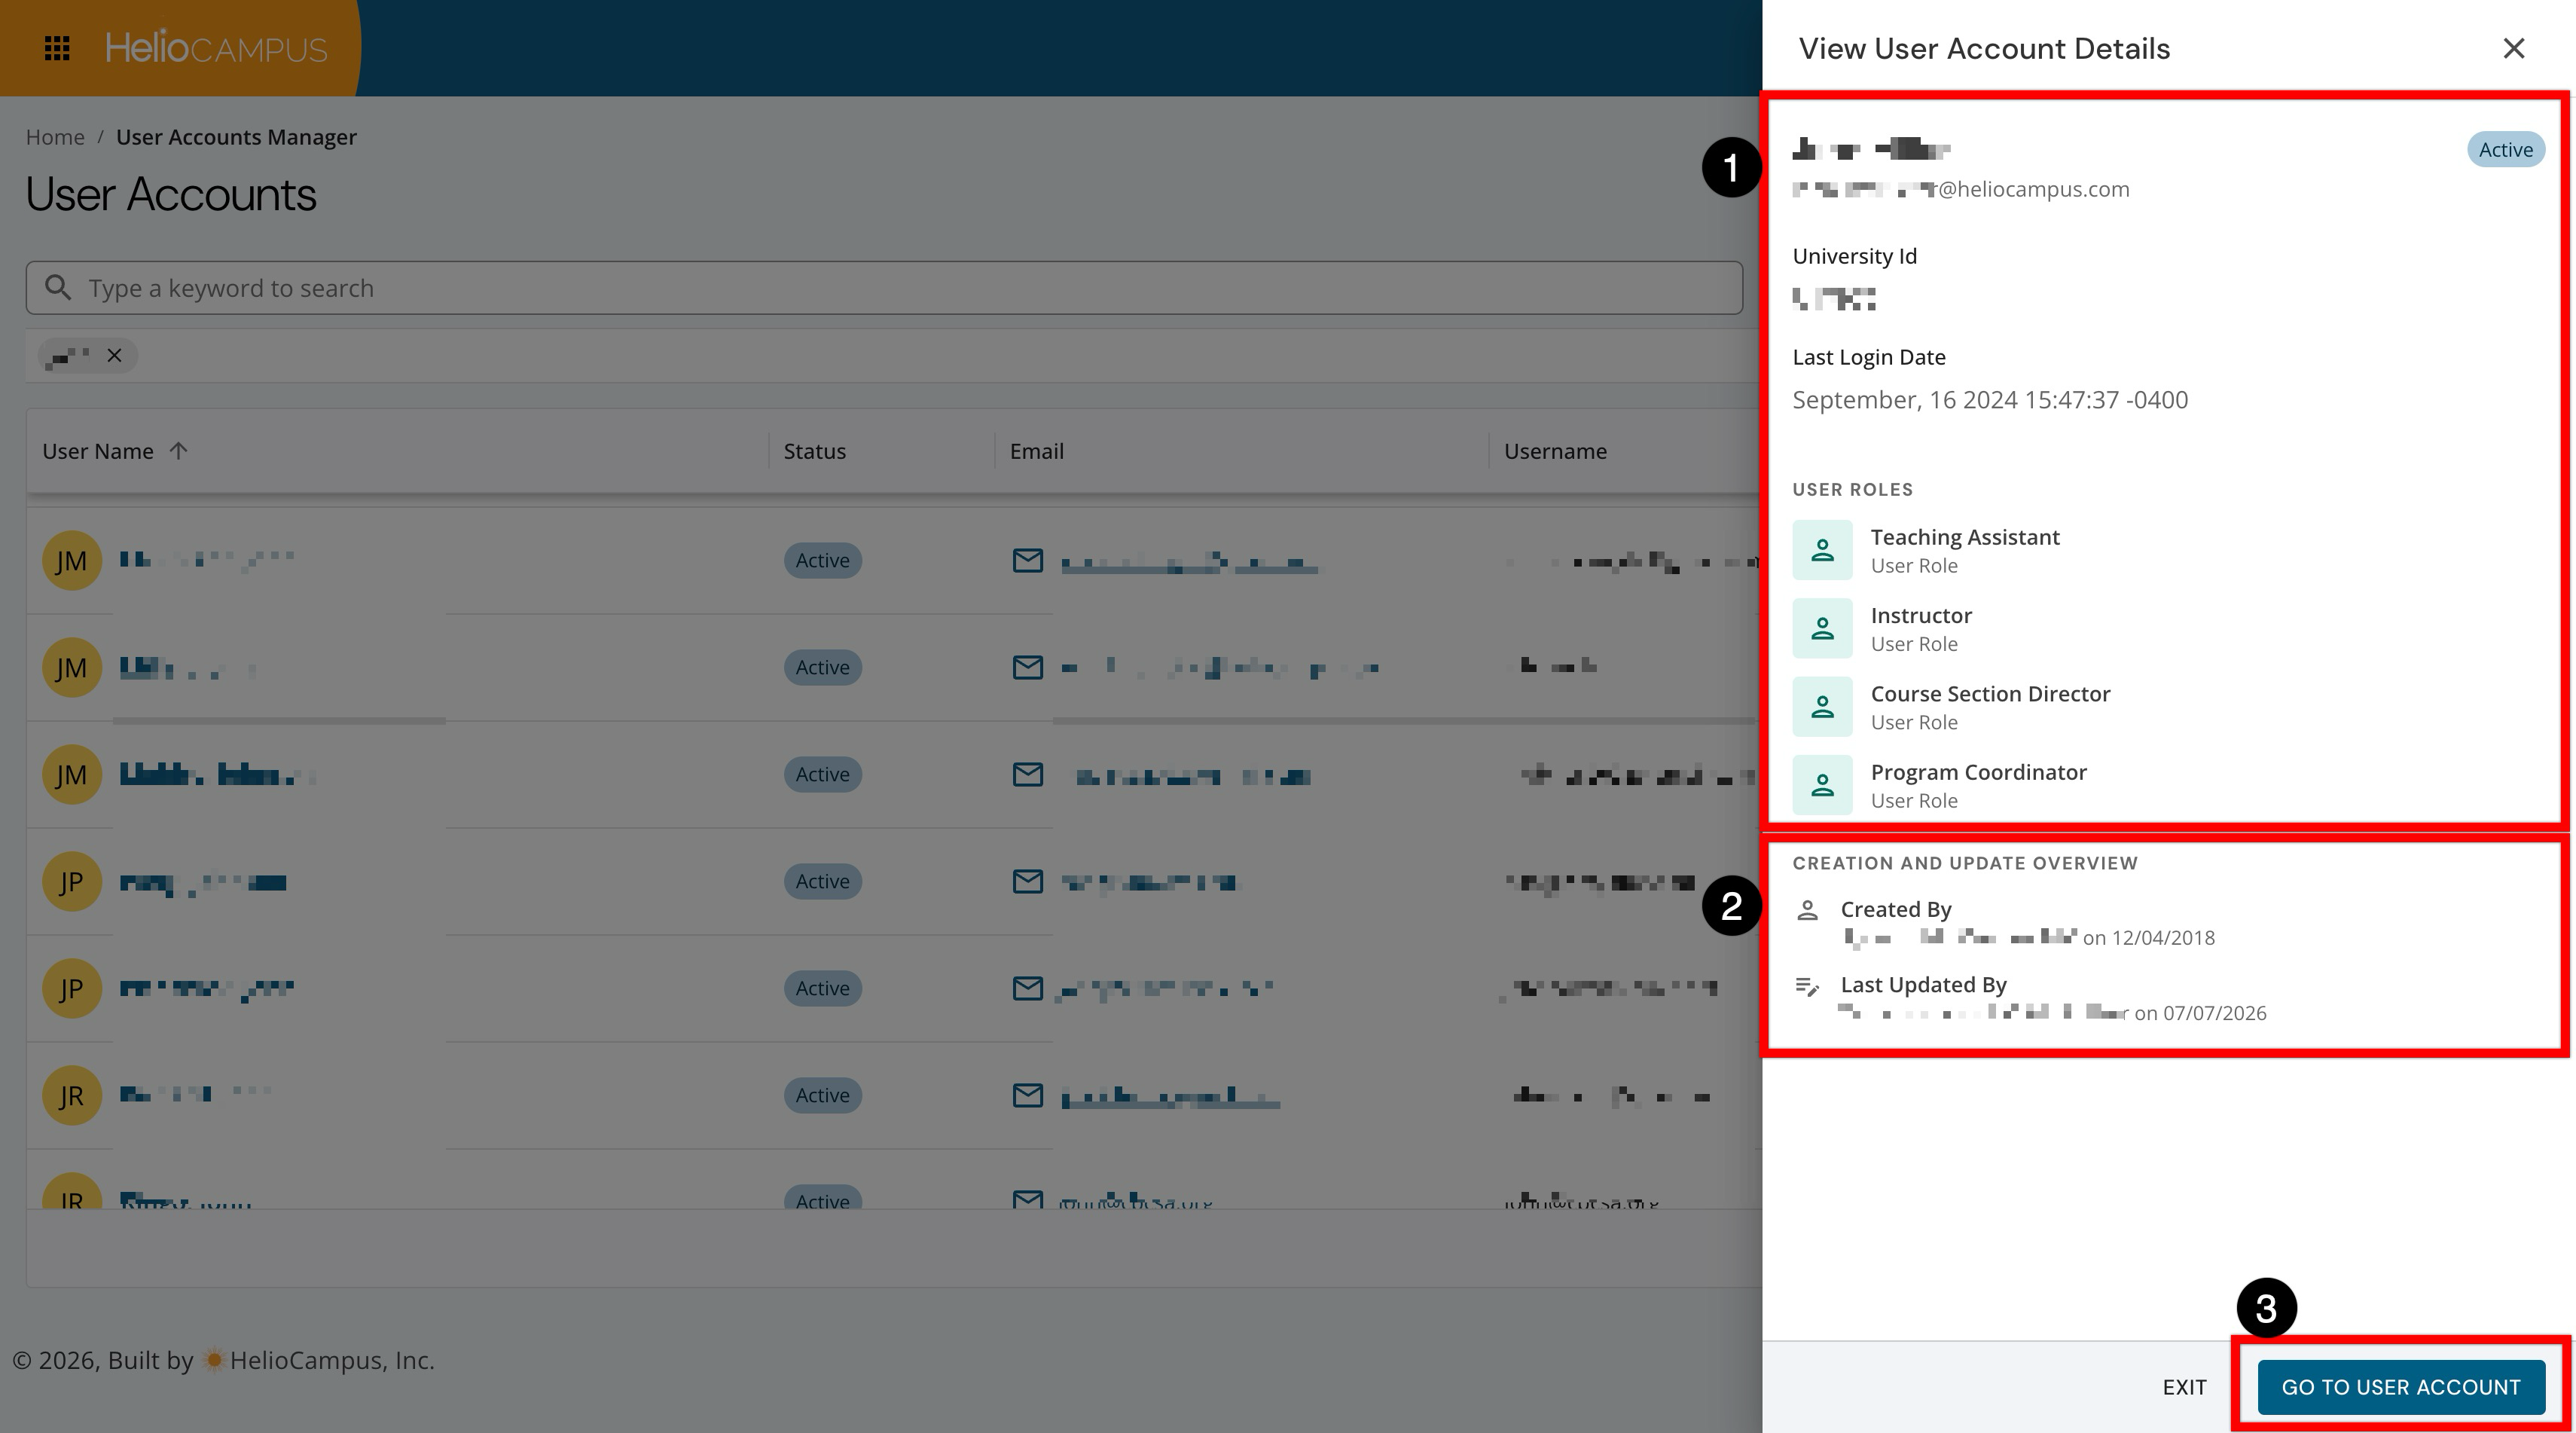
When viewing quick-glance details, general information similar to the list view appears first, along with assigned user roles (1). Creation and update information is also available, including the user name and date (2). Clicking Go To User Account will navigate to that user’s Homepage (3).
User Account Homepage
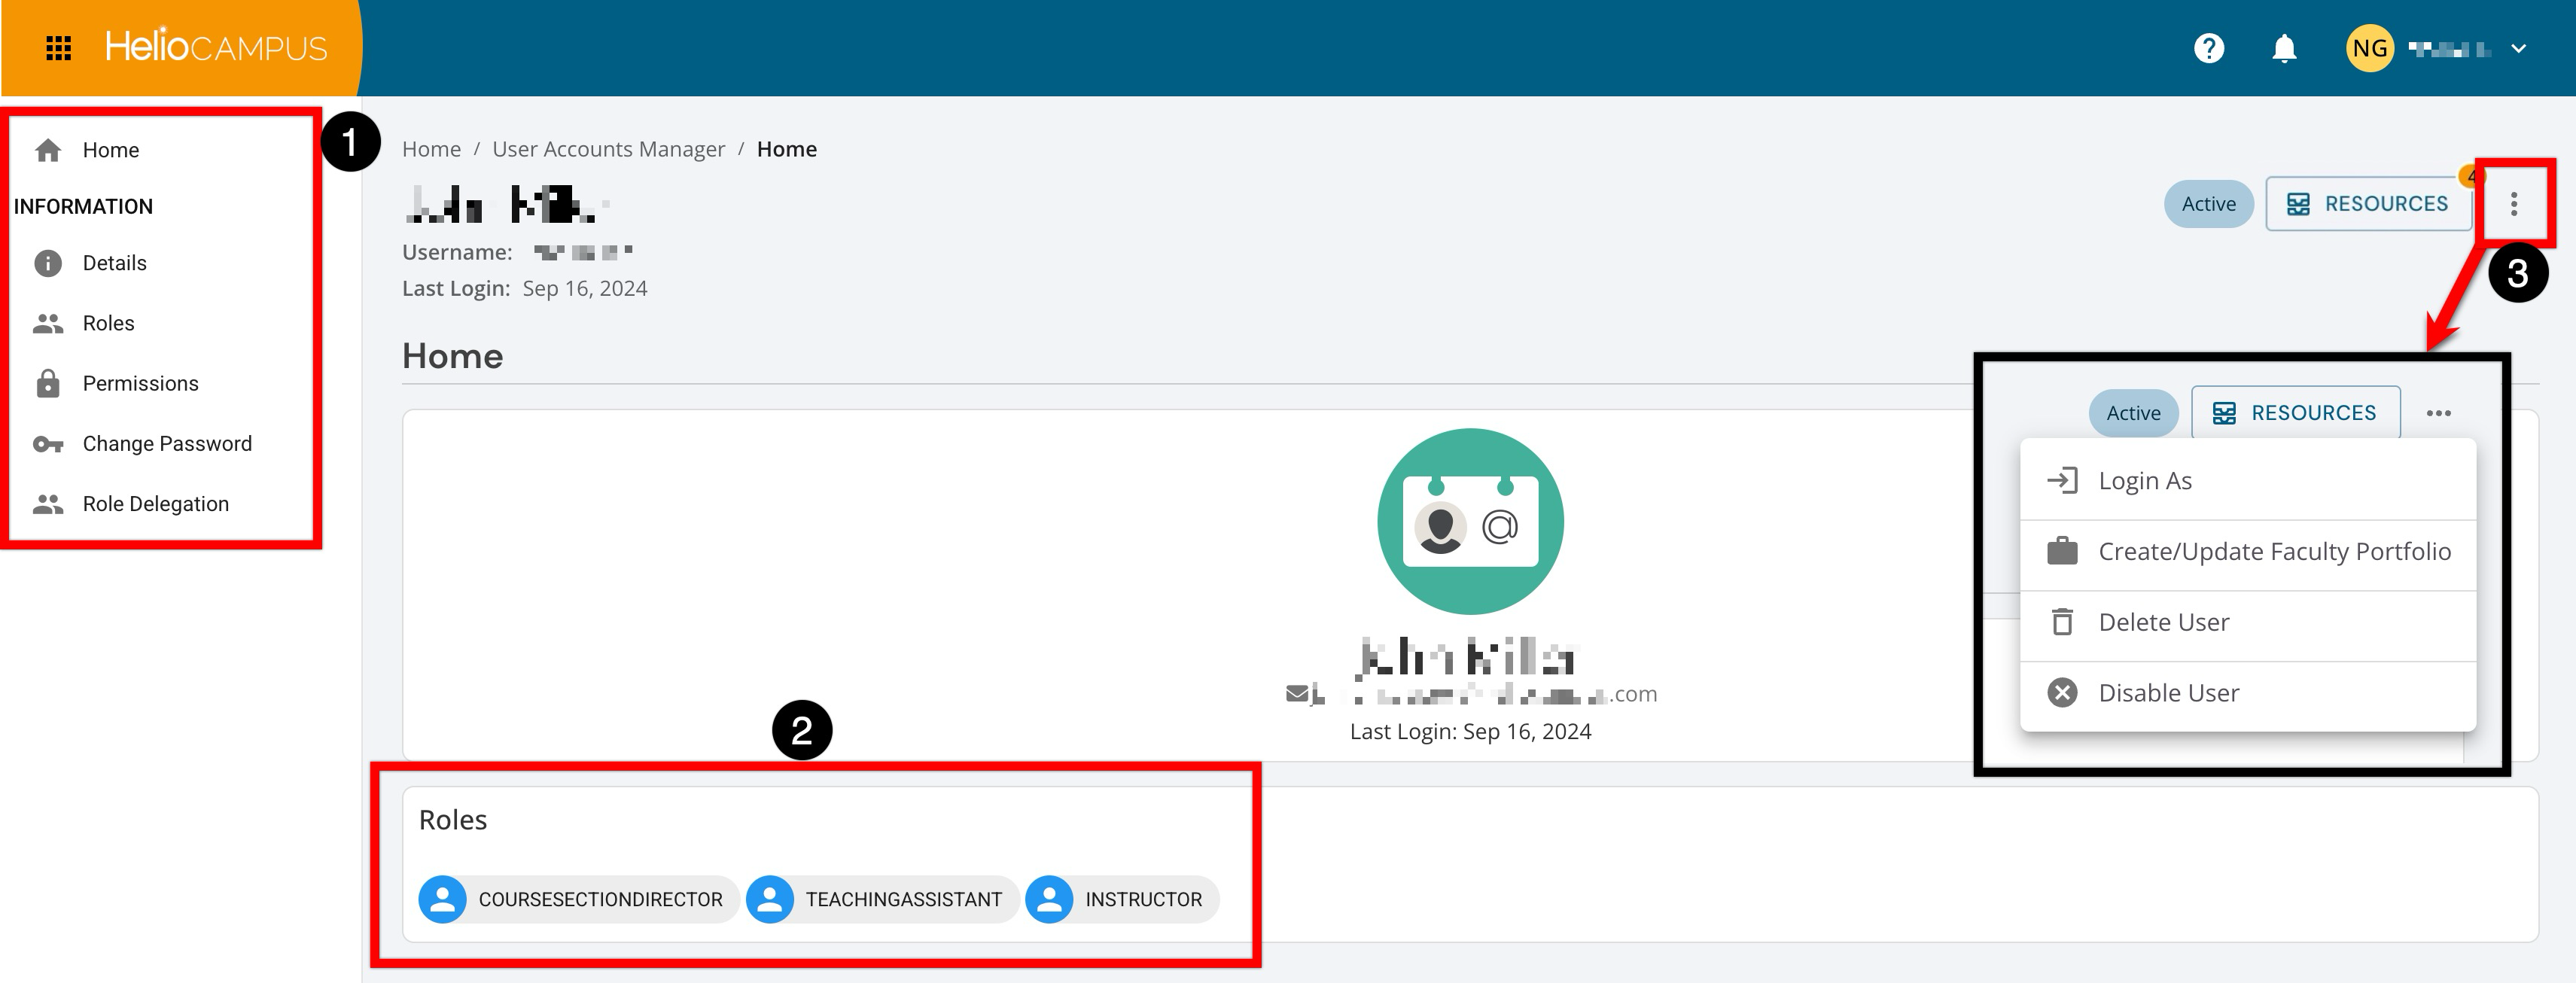
The Homepage is the landing page for a selected user. It provides an at-a-glance overview of the user and also serves as the access point for user details and configurations. The left-hand menu is the user navigation menu (1), organized into sections for information and outcome configuration. Role information is easily accessed right from the Homepage for quick-glance access (2). At the top right of the page, the action menu (3) provides access to the Login As functionality, portfolio creation, and user management options. The Login As functionality is only available to users with sufficient role-based permissions within the hierarchy.
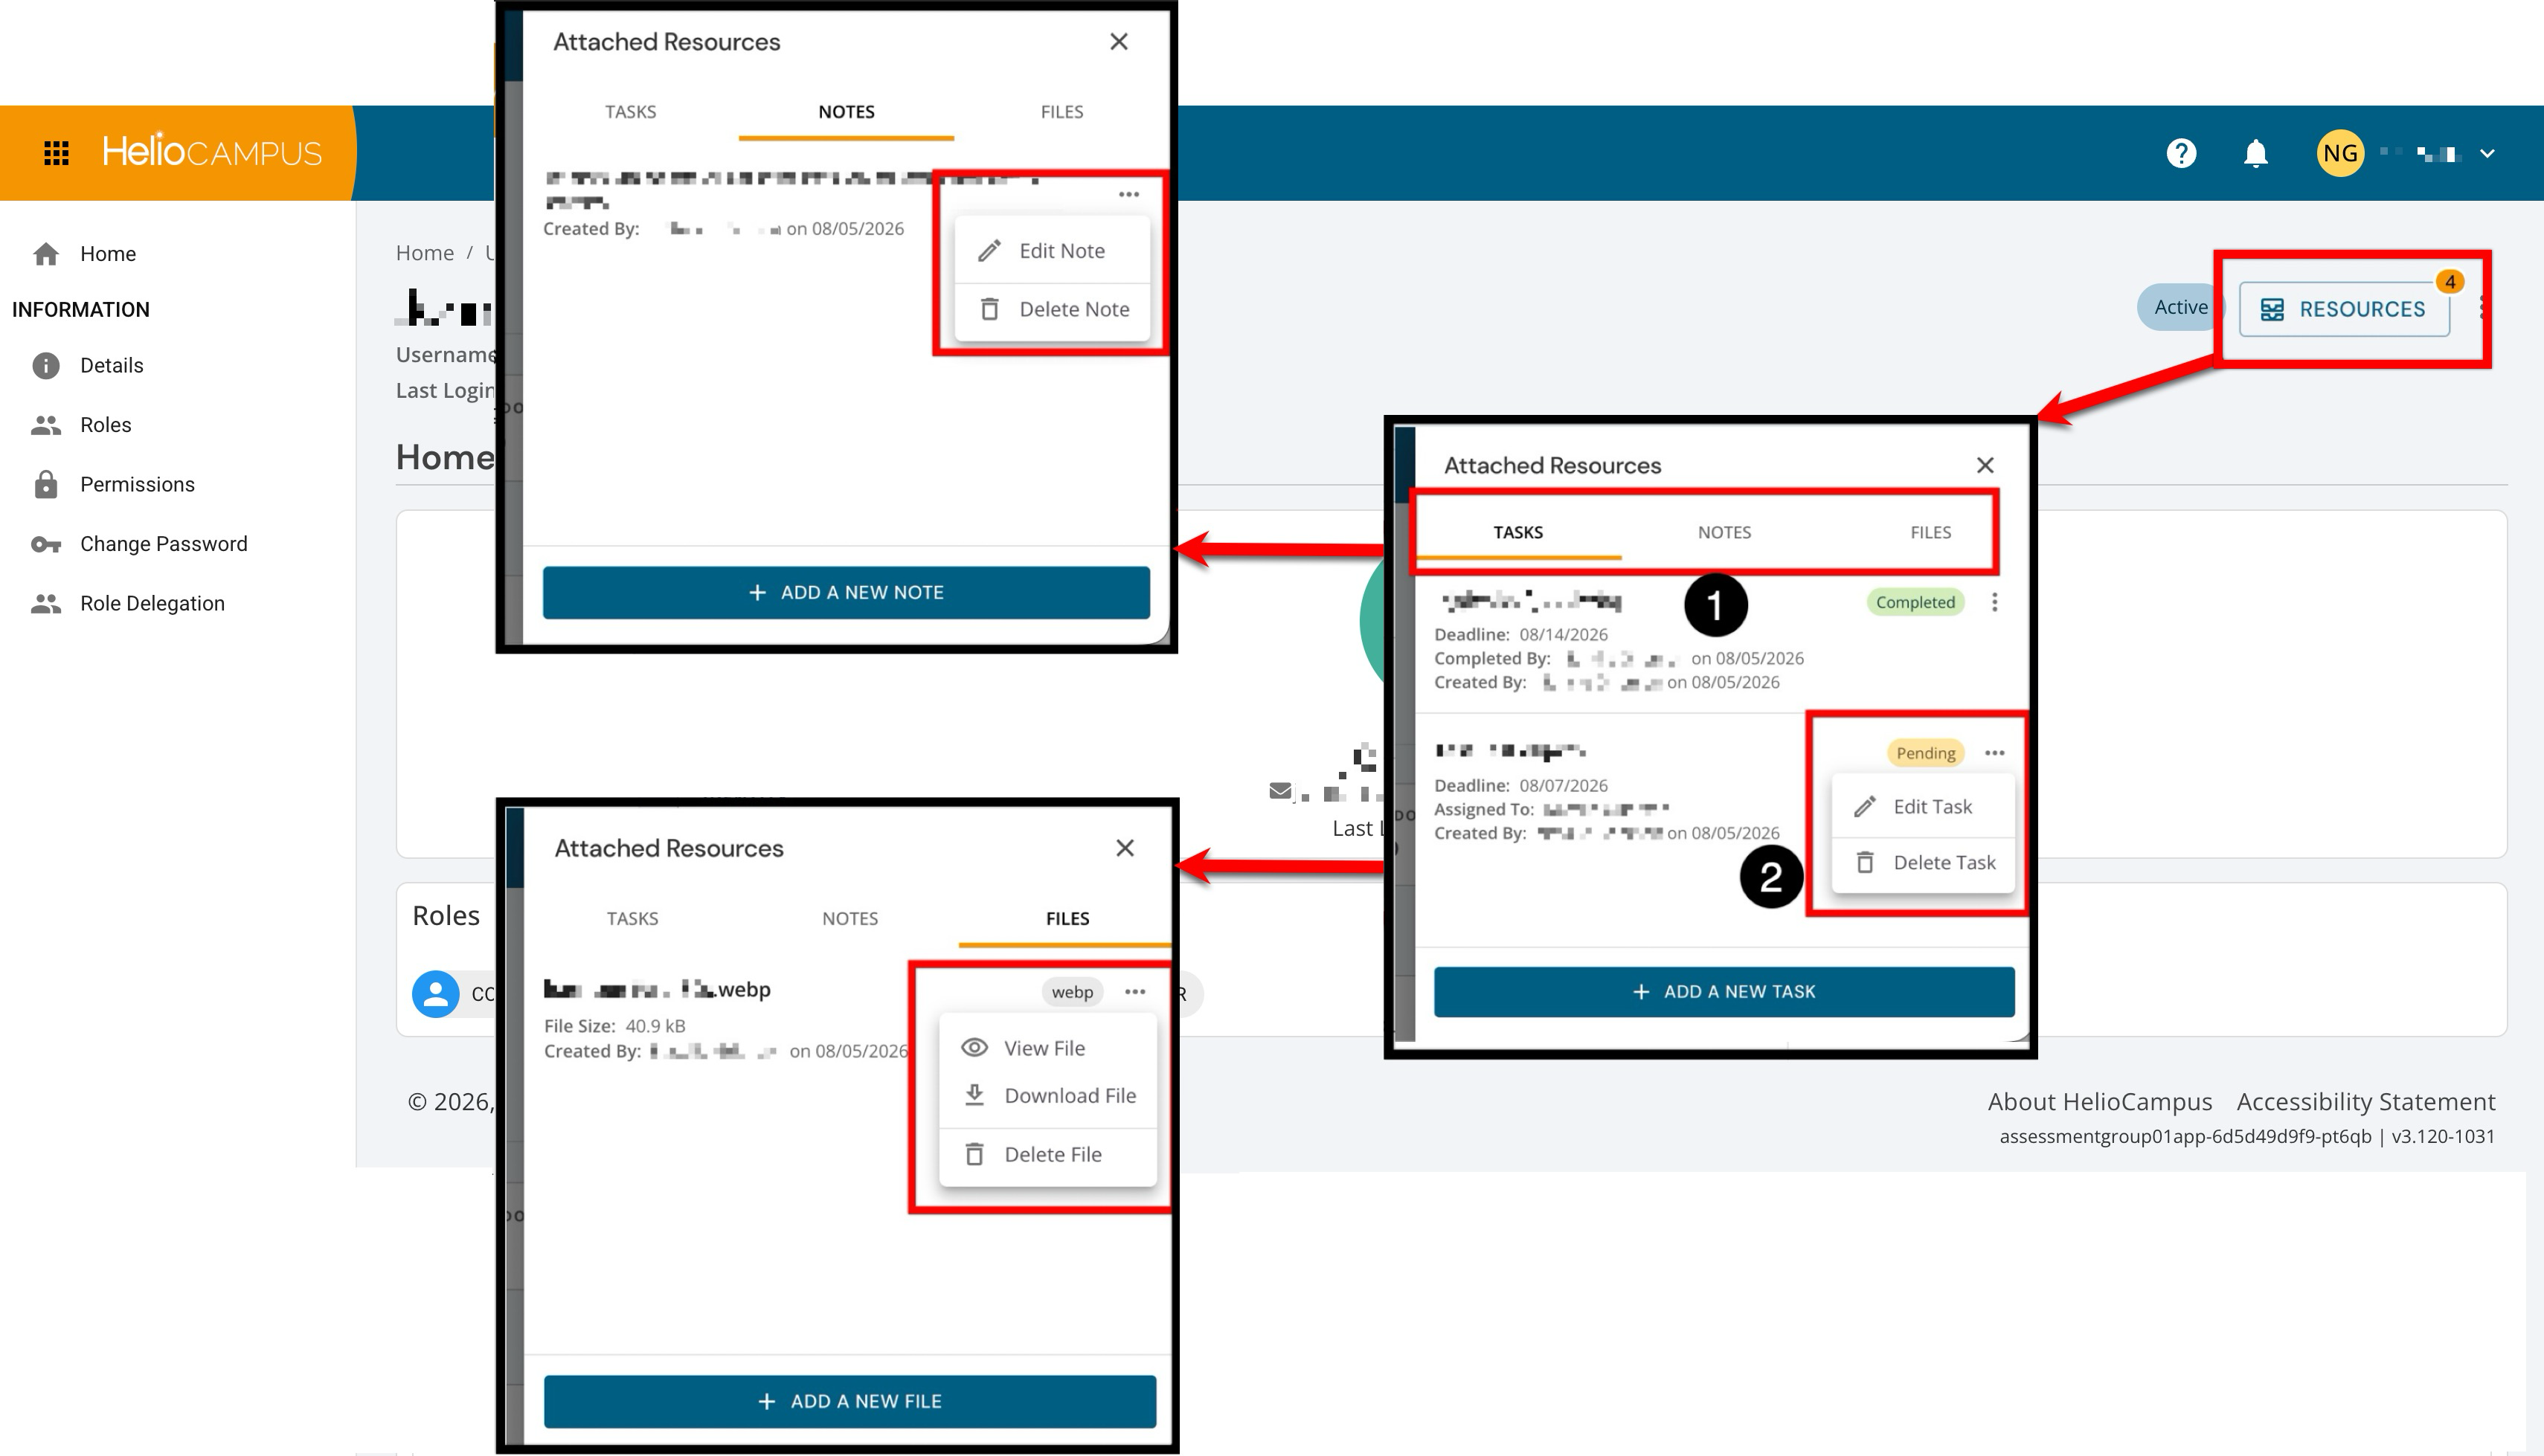
Click the Resources button to access set-specific attachments in a centralized drawer with organized tabs for tasks, notes, and files (1), with options to view, edit, or delete, as applicable, by resource type (2). Users can quickly add new resources through the action buttons at the bottom of each tab.
-
Tasks: Displays tasks assigned to the selected outcome set, with creation and assignment details, due dates, status indicators to track progress, and options to edit or delete tasks.
-
Notes: Provides quick access to all associated notes with timestamps and creation details, with options to edit or delete notes.
-
Files: Displays all attached documents and media, with options to view, download, or delete them.
Logging In As a User
Login-as functionality is available to users with sufficient role-based permissions within the Organizational Hierarchy. Institutional Admins can log in as all users, while Department Admins and College Admins can log in as only faculty users. Users can log in as faculty only if they do not also have a student account, since there is a risk they could identify particular responses.
|
Role |
Login-as Permissions |
|---|---|
|
Institution Admins |
Institution Admins can log in as all users within the Organizational Hierarchy, including students. |
|
College Admin Department Admin |
College and Department Admins can log in as faculty members, such as Instructors and Course Section Directors. To preserve student anonymity, admins assigned the Student user role cannot log in as faculty members. |
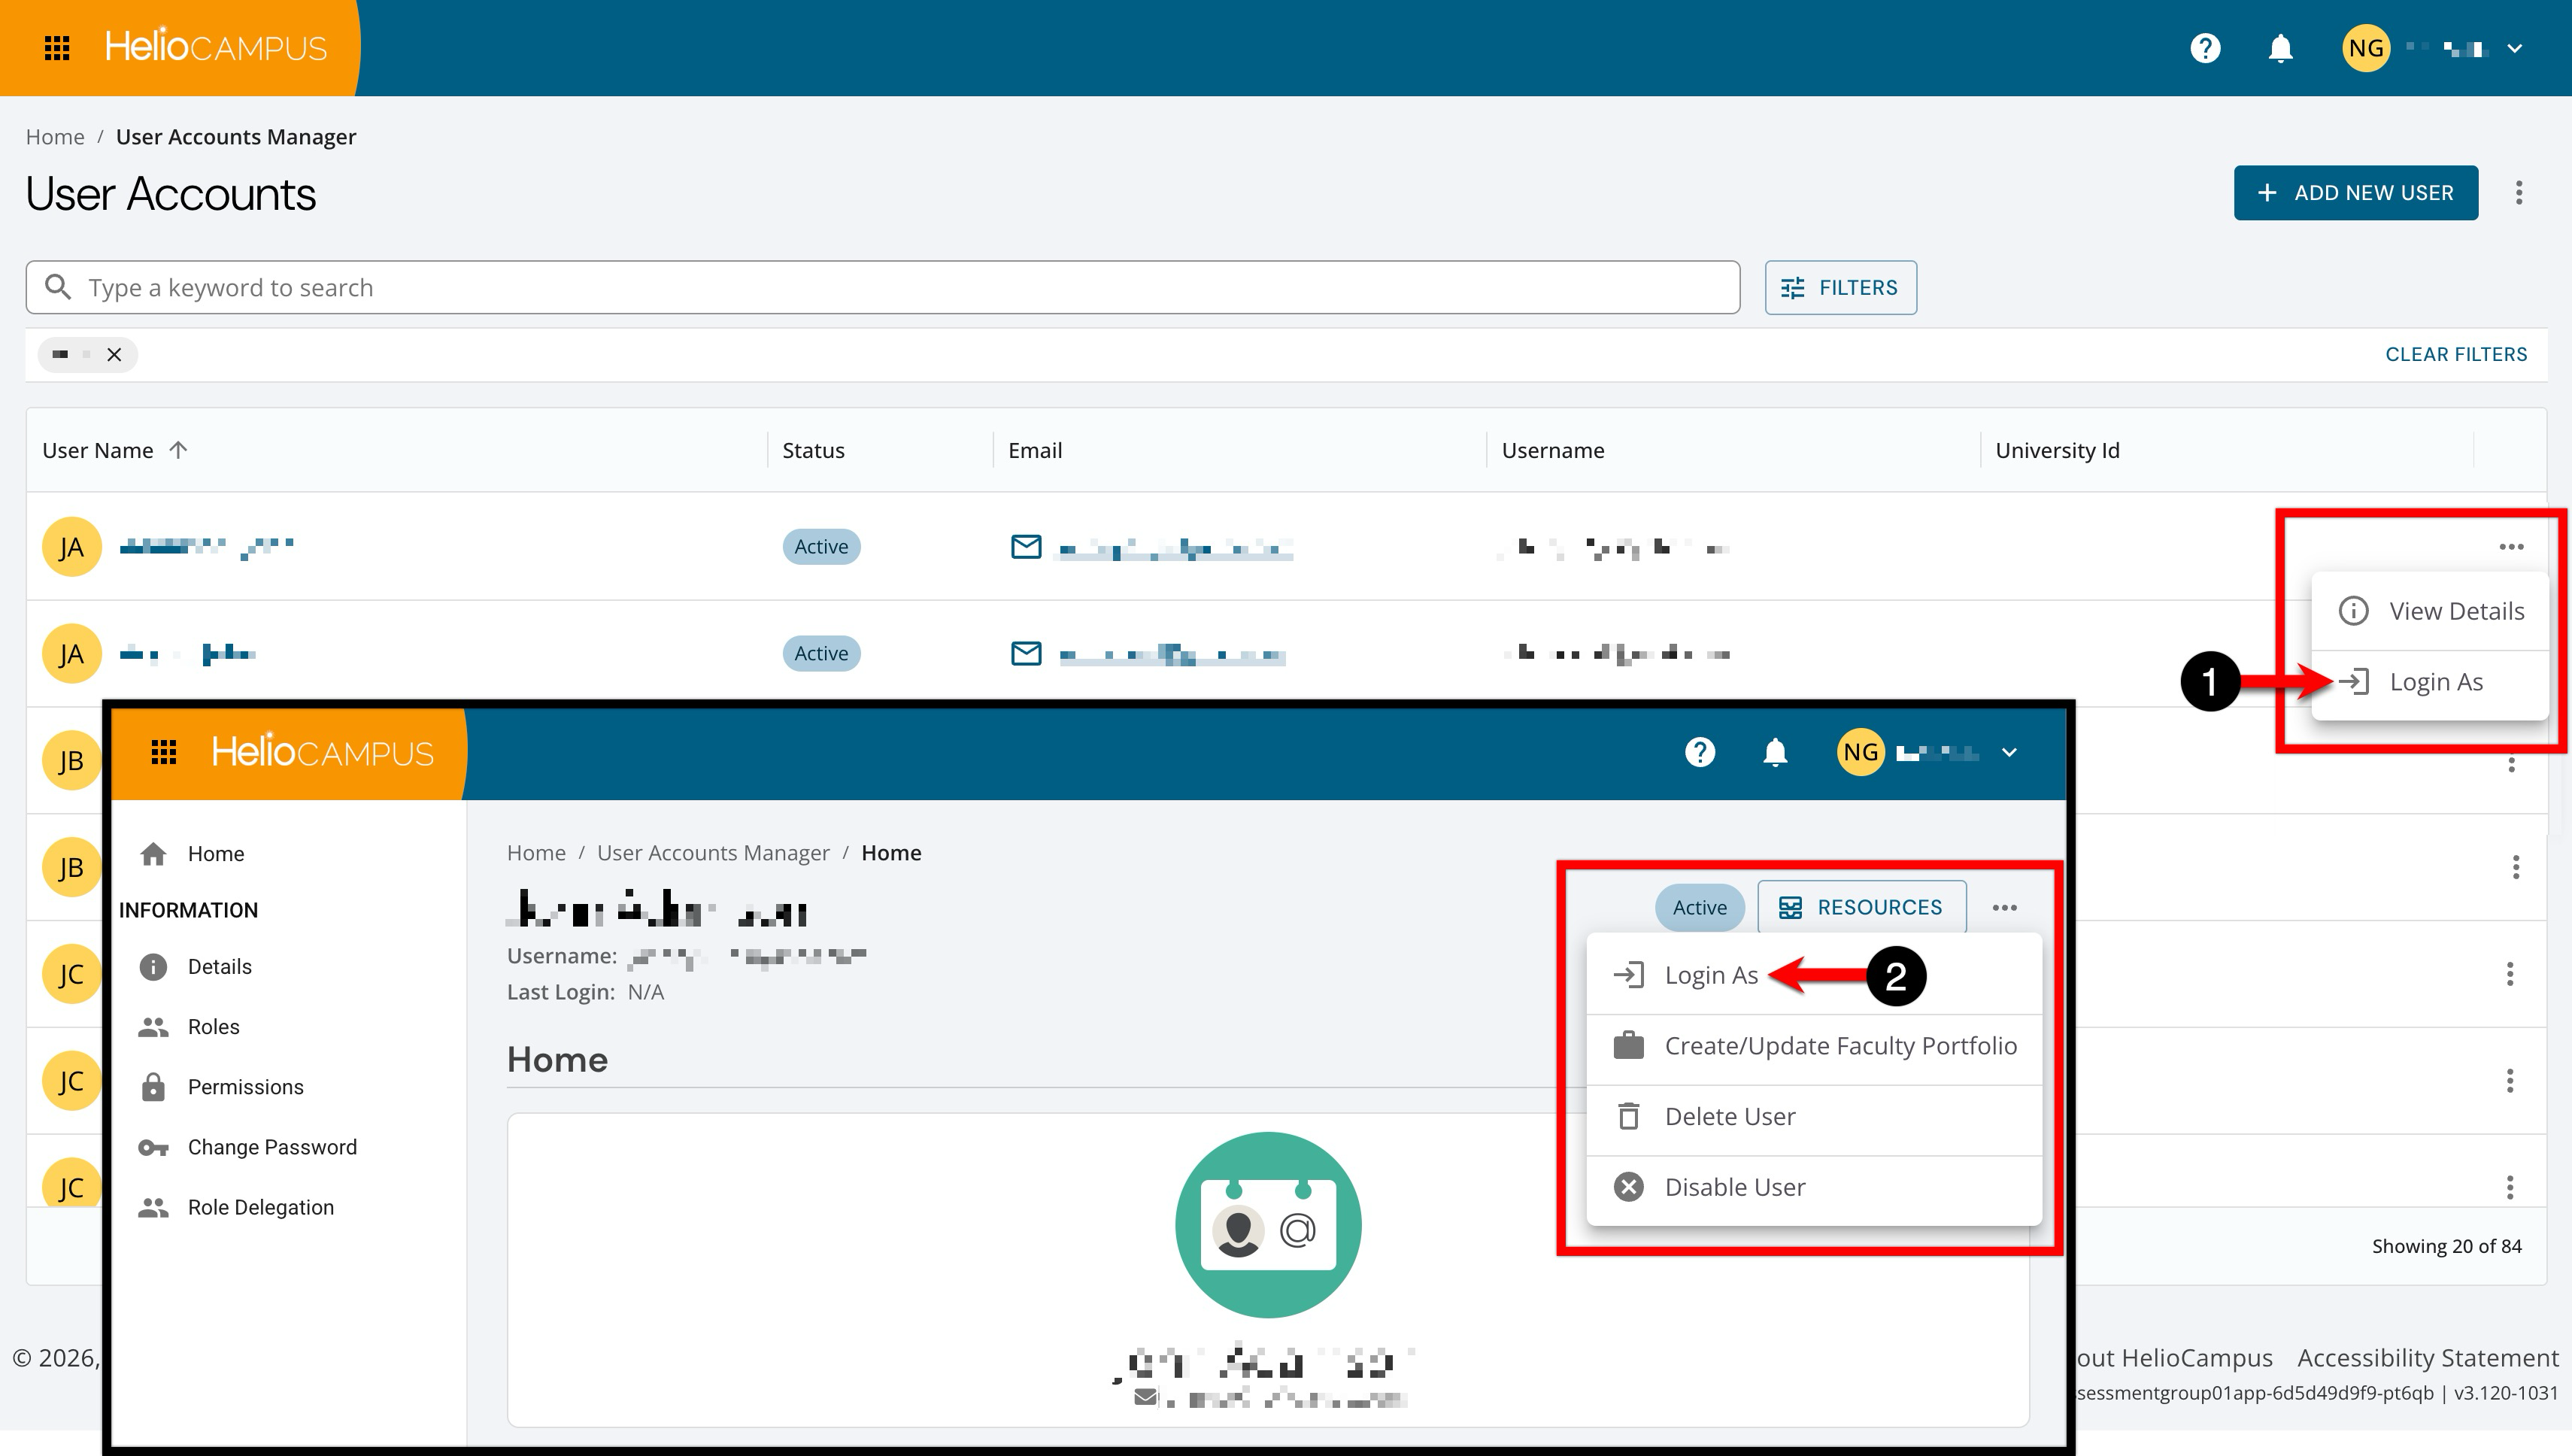
Login-as functionality is available via the User Accounts Manager by expanding a user’s Actions menu (1), and from the user account’s Homepage by expanding the More Options menu (2).
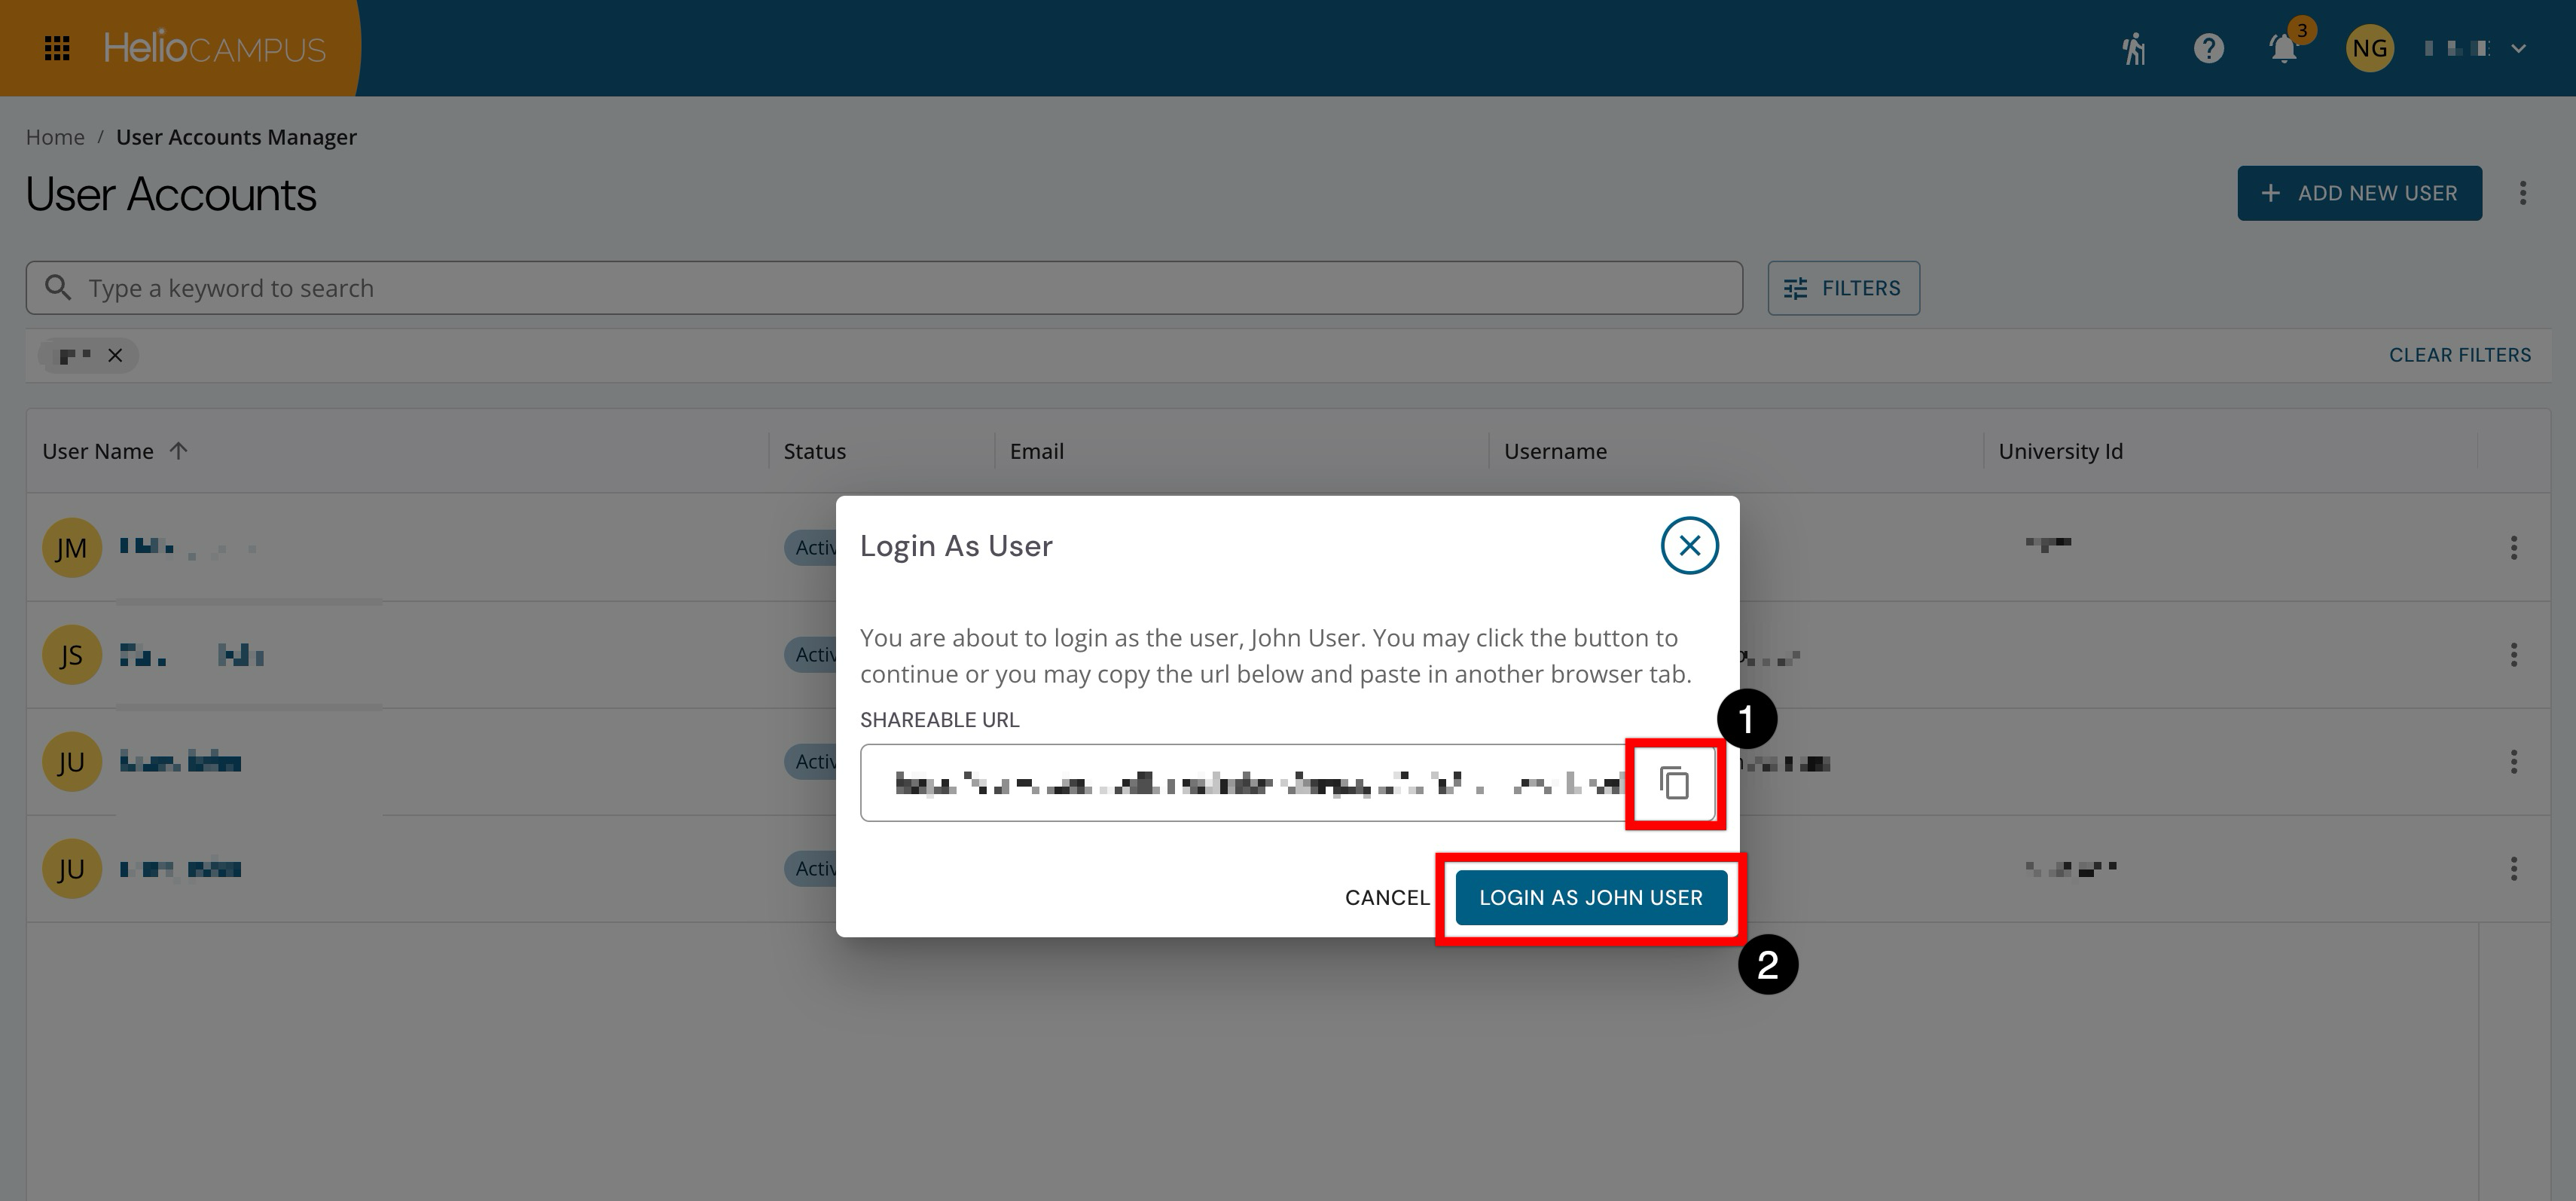
In the Login As User pop-up, either copy the shareable URL (1) and paste it into a new browser tab or window, or click Login As… (2) to continue the login process in the current tab or window.
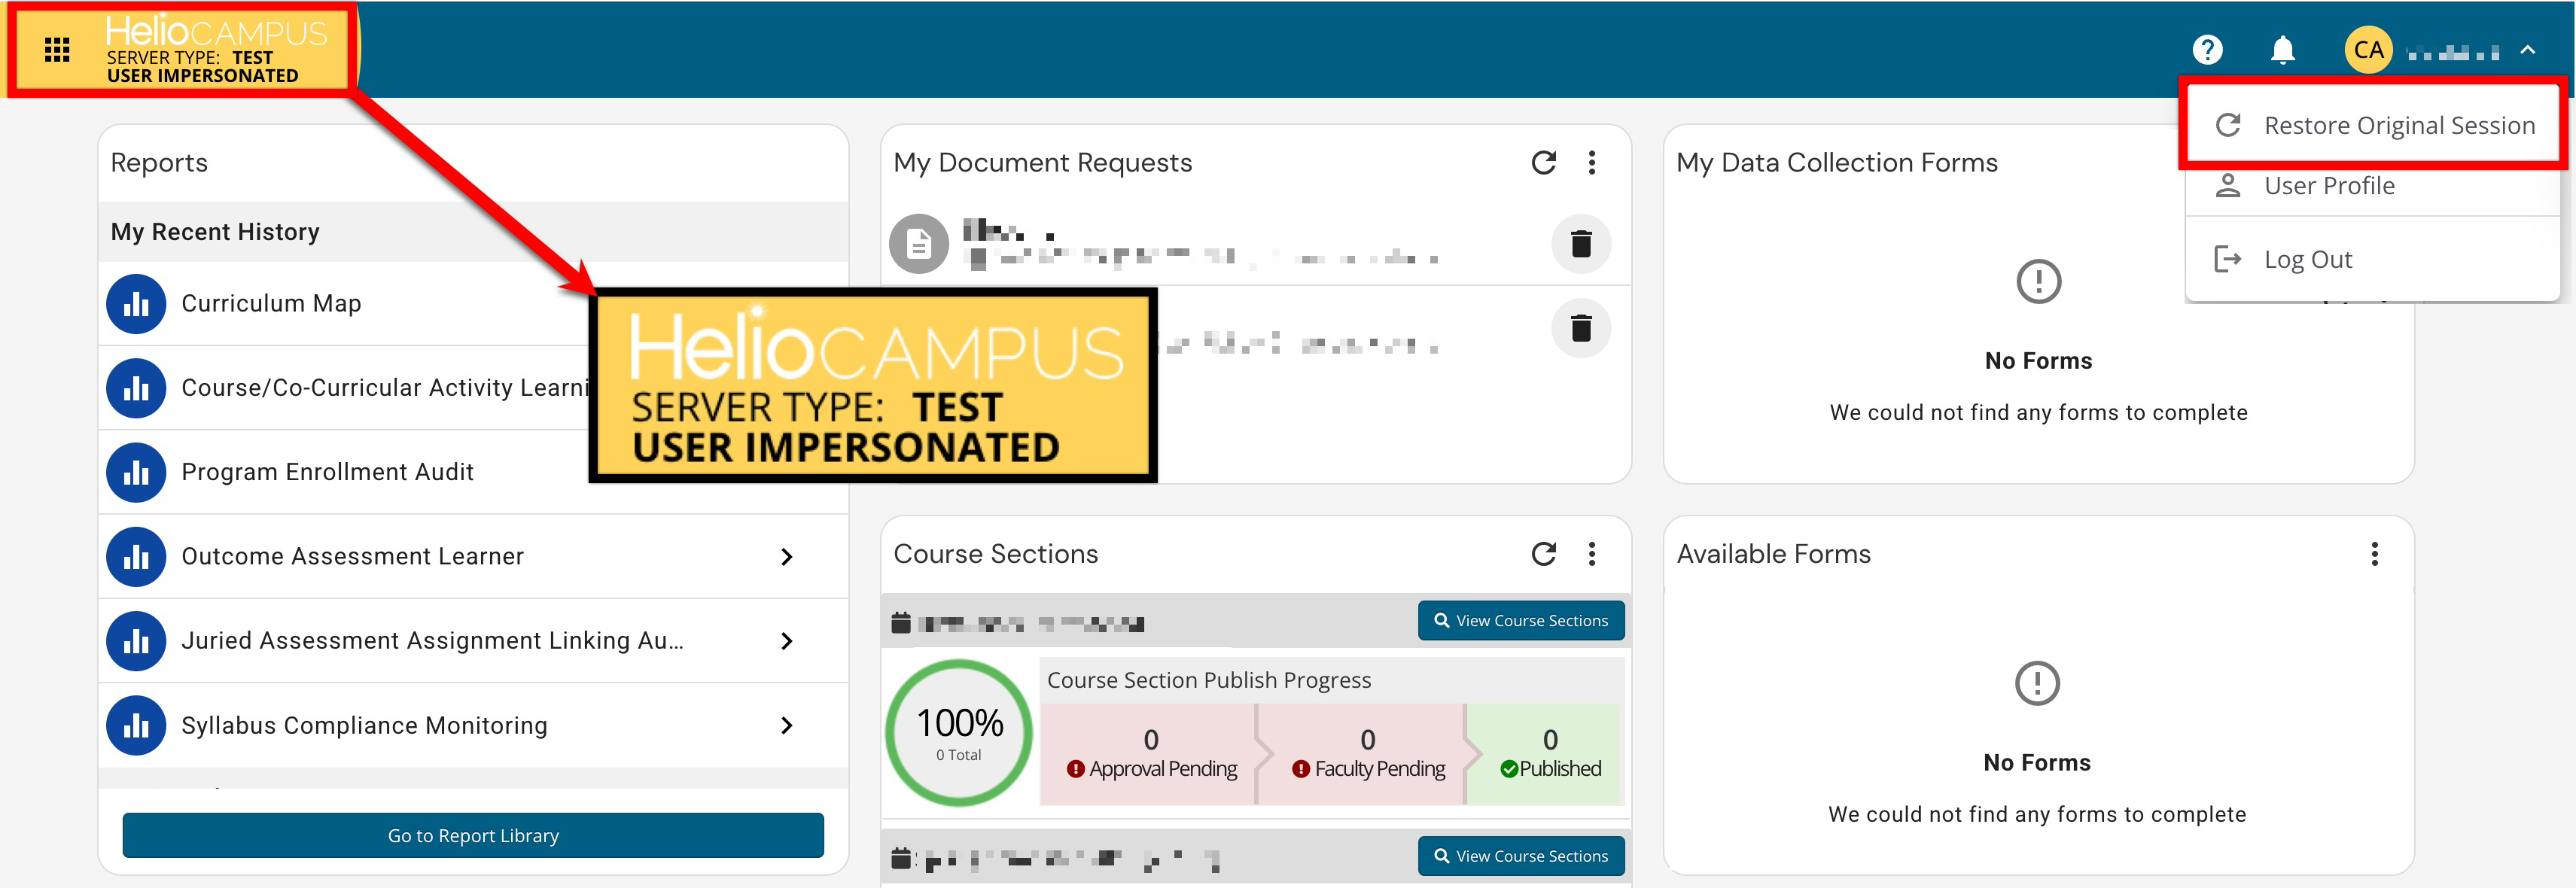
Once logged in as another user, user impersonation appears in the upper left of the platform; any actions taken within that user's account appear on the platform as taken by the admin. An admin can restore their original session by clicking the restore option at the top of all screens in the platform.
Example
Scenario: Administrator Jane logs in as Instructor John and completes a task assigned to John.
In this scenario, the platform will show that Administrator Jane completed the task, even though she was logged in as Instructor John when she did so.
Create/Edit Faculty Portfolio
Product Tip
Once HelioCampus enables this functionality, users can manage a faculty portfolio via the Actions menu on the user accounts Homepage. To learn more about and enable this functionality, please contact Support.
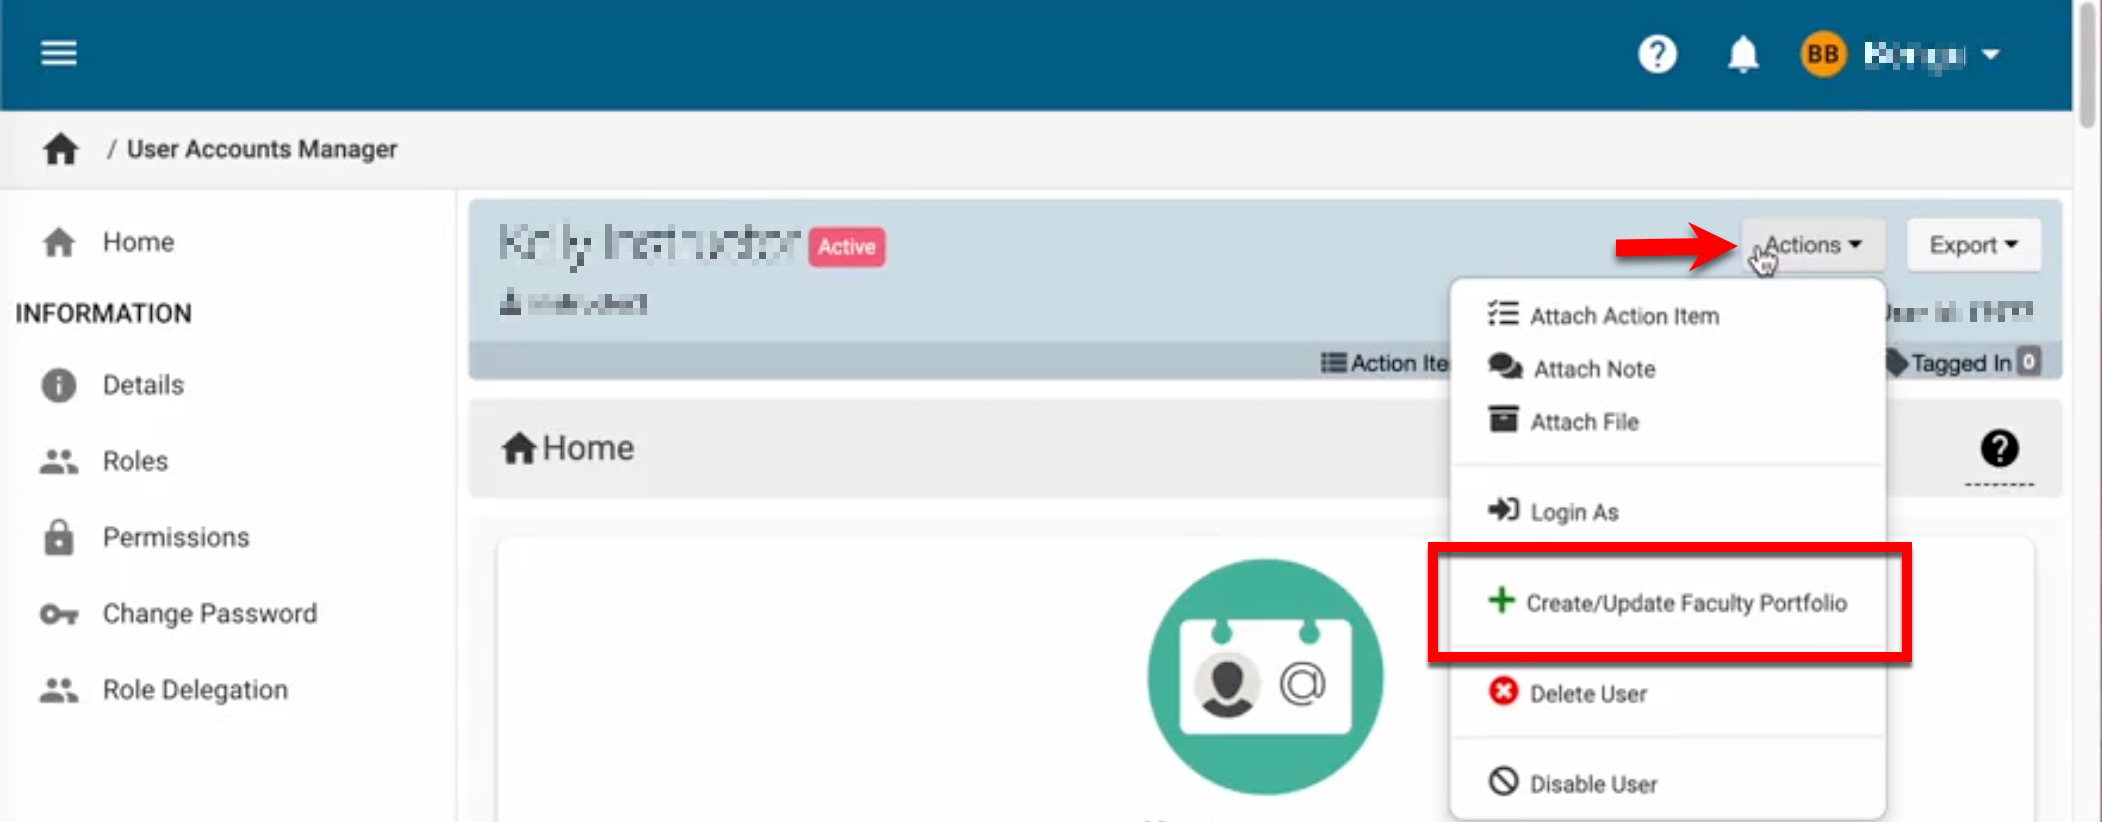
Institution Admins can navigate to the User Accounts Manager and select Create/Update Faculty Portfolio from the Actions menu. The Create/Update Faculty Portfolio pop-up will display based on the user’s current faculty portfolio status.
|
No Current Faculty Portfolio |
|
When a user does not currently have a faculty portfolio in the platform, the pop-up will default to creating one. After selecting a College/Administrative Division and Department/Administrative Unit, click Update to create the faculty portfolio. 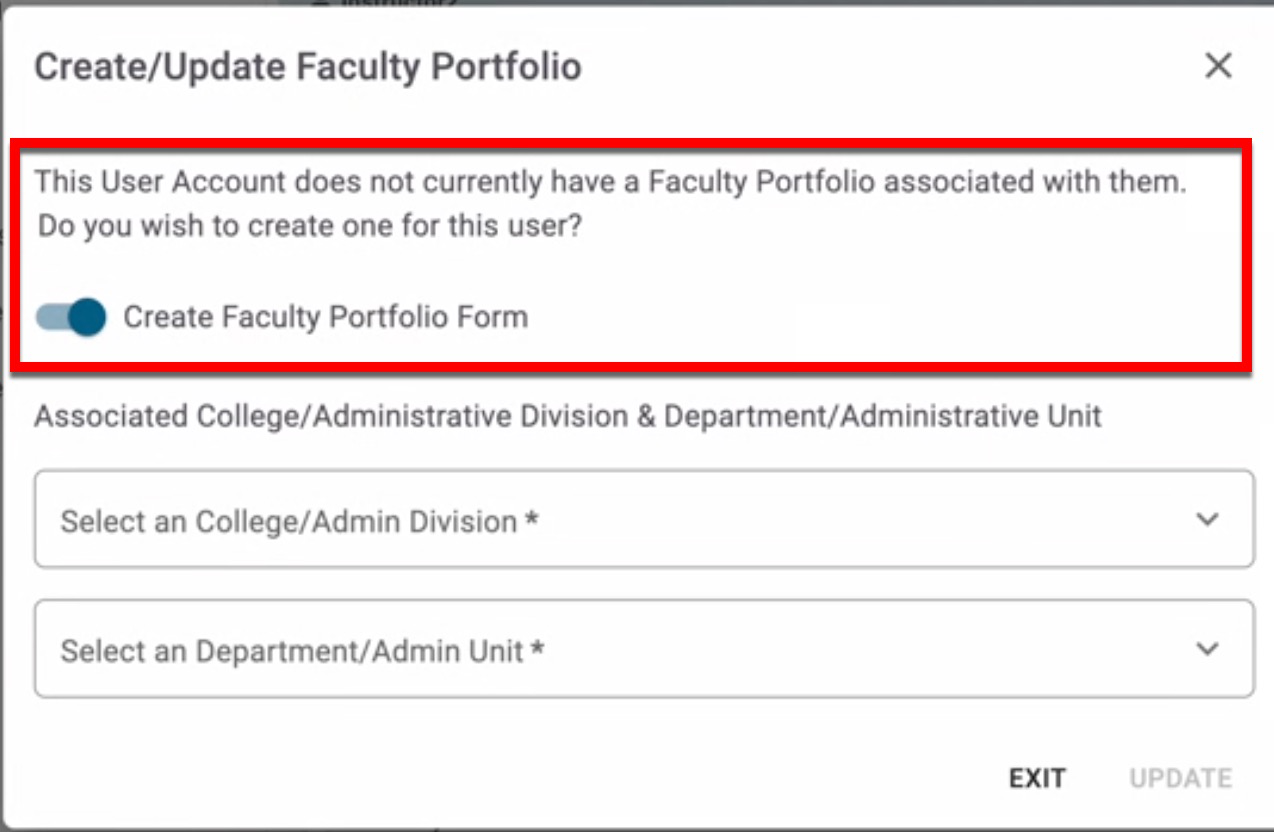
|
|
Faculty Portfolio On File |
|
When a published faculty portfolio exists in the platform, the pop-up will default to changing the portfolio status (1) to Archived or Deleted, or No Status Change. 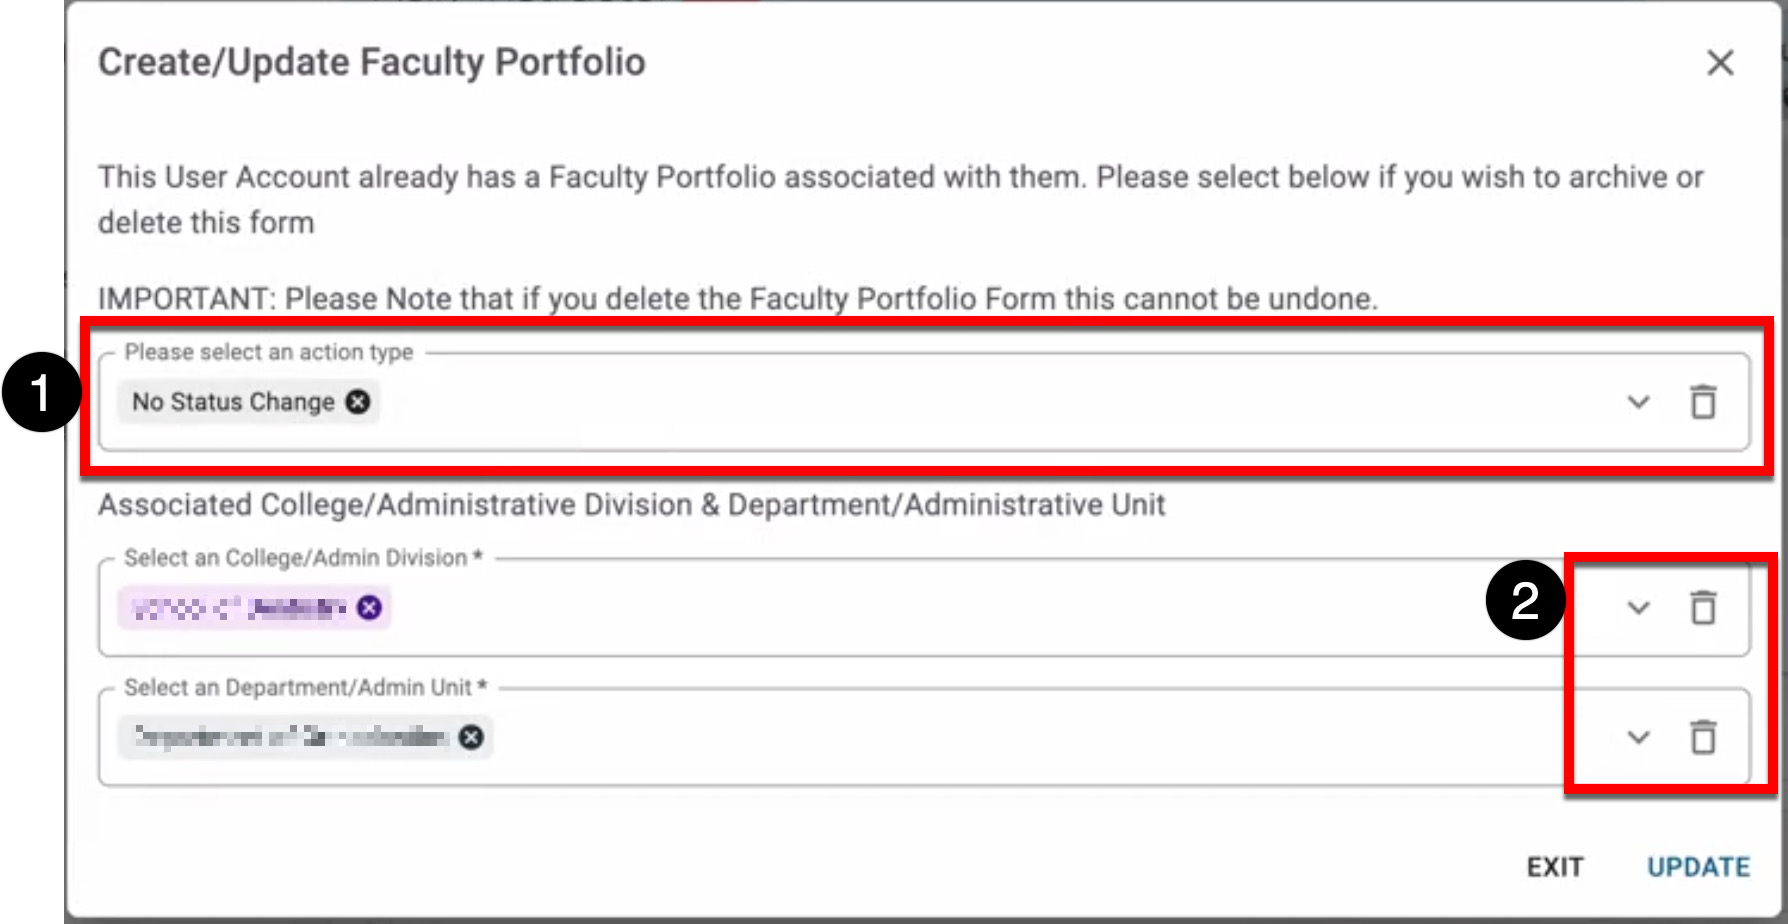
|
|
Archived Faculty Portfolio |
|
When a faculty portfolio exists in the platform but has been archived, the pop-up will be configured by default to unarchive the portfolio (1); the associated College/Administrative Division and Department/Administrative Unit can also be modified or deleted (2). 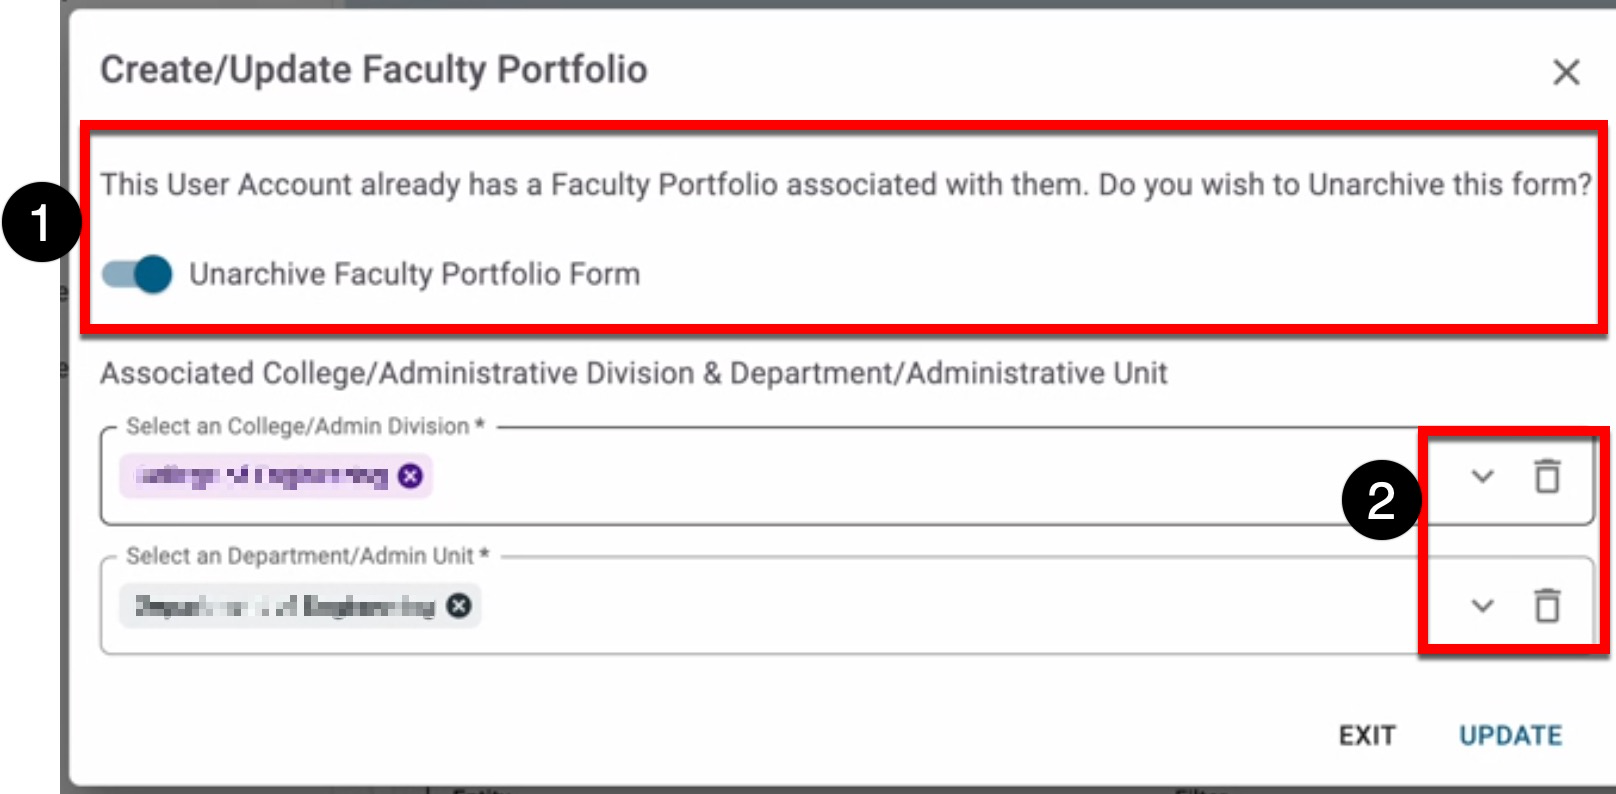
|
Deleting vs. Disabling Users
Product Tip
When access needs to be removed, disable the account or deprovision the user through the institution’s identity provider/SSO instead of deleting the account. This prevents access while keeping the HelioCampus record and historical data intact. Keep historical roles associated with the account unless they must be changed, since role changes can affect access to historical records or previously submitted data.
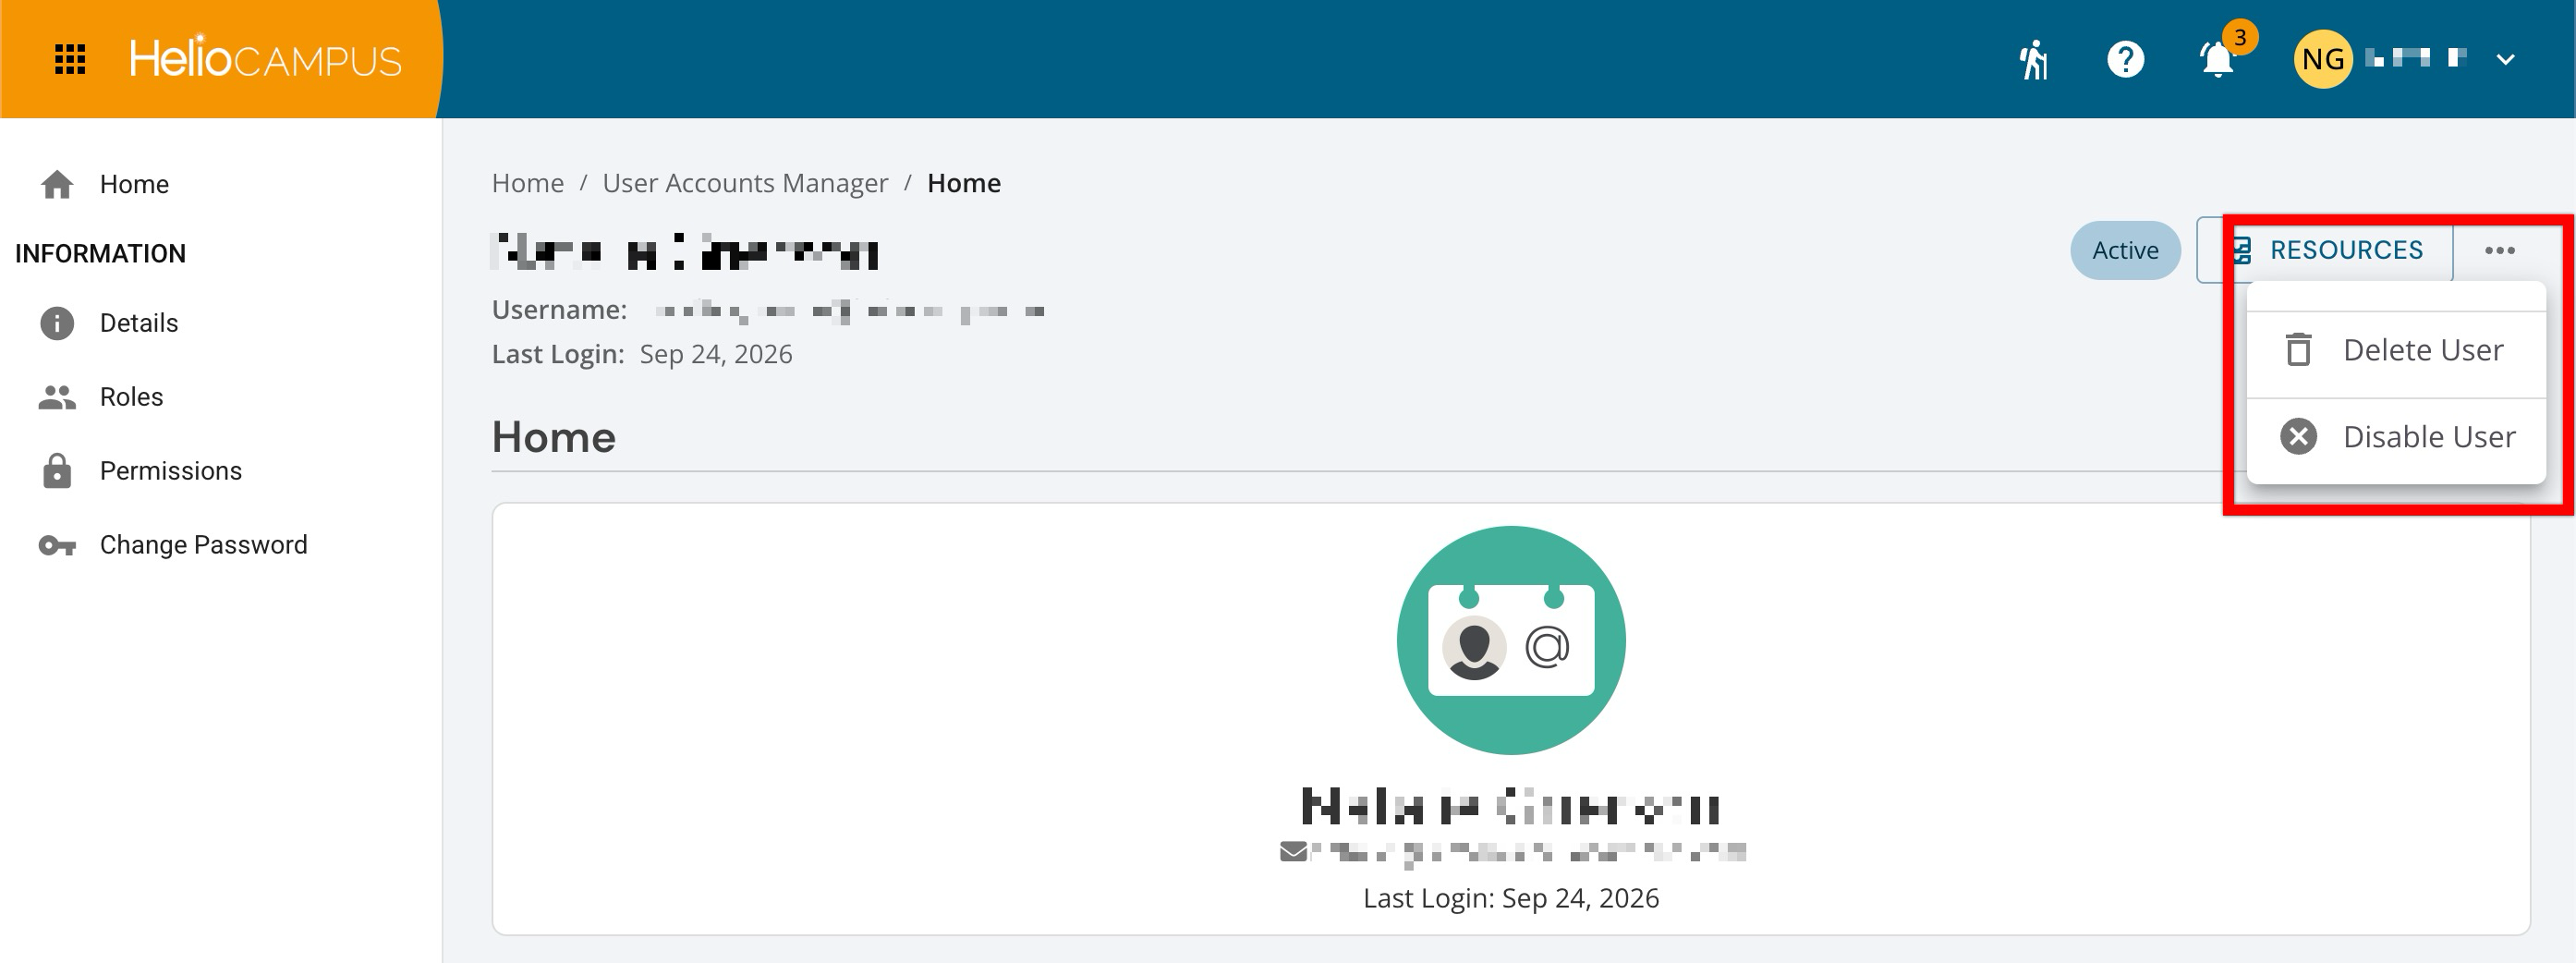
From the user account’s Homepage, expanding the More Options menu presents options to manage account access. Selecting Disable User prevents the user from logging in while keeping the user record available for reporting and historical reference. Selecting Delete User permanently removes a user, which is an irreversible action and should be used with caution.
|
Action |
What happens |
|---|---|
|
Disable User |
The user can no longer log in to HelioCampus, and they will no longer receive survey invitations or reminder emails for active or future evaluations. The user record, course associations, and historical survey/evaluation data remain in the system for reporting and historical reference. The account can be re-enabled later, if needed. Recommended Use: Recommended for routine user cleanup, such as users who have left the institution or no longer need access to the platform. |
|
Delete User |
Permanently removes the user account and associated roles. Deleting an account may affect historical records or links associated with that user. Recommended Use: Use only for duplicate or accidentally created accounts. Do not use deletion for routine account cleanup. |